This blog post is all about installing and activating a WordPress plugin to your blog. This part of the tutorial can be executed in three easy steps: Downloading, Installing, Activating. After downloading the plugin from the internet, you will need to upload it onto your site or FTP server through an FTP connection software like Filezilla or Cyberduck.
Once uploaded successfully, WordPress will automatically activate it for you and show a confirmation message on its dashboard widget area. So if you want to make your blogging experience easier by adding more functionality without getting into coding mode all this time then this article is for you!
You might also want to read “5 Easy Steps To Create A Blog” as well since creating a website using WordPress is not that difficult.
We are going to show you how to install and activate the WordPress plugin on your blog. This is a tutorial for the new bloggers who want to start their blogging journey.
You can also read this article if you have some technical knowledge about installing plugins in WordPress, but need a quick refresher on activating them.
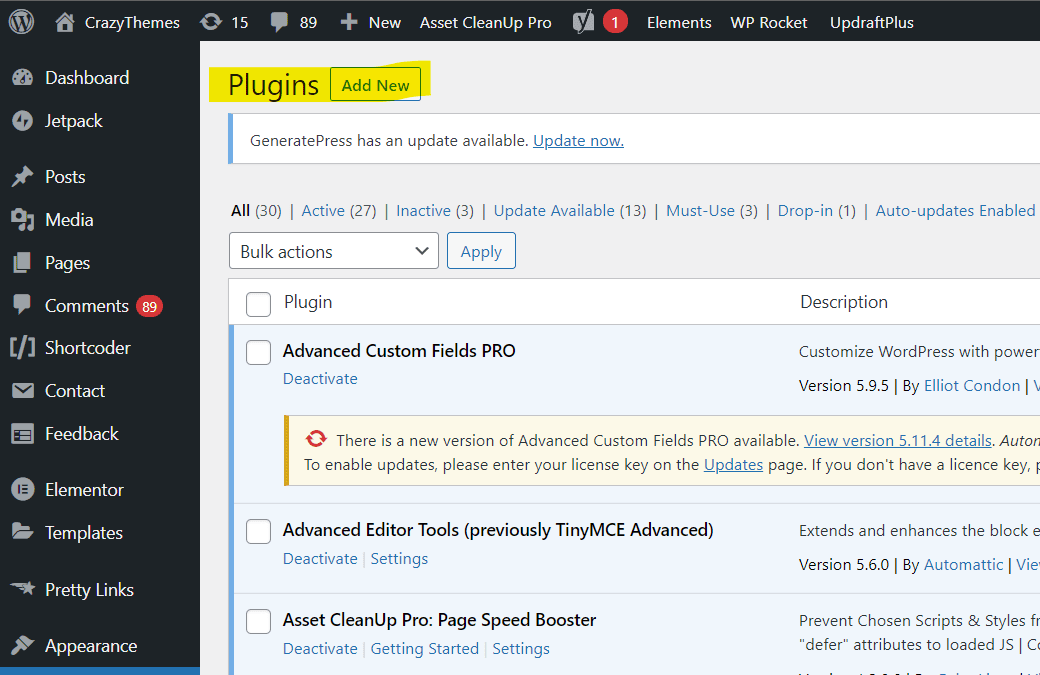
To get started, log into your dashboard and go to Plugins > Add New from the sidebar menu bar. 
Here’s where we’ll find our list of available plugins that we can choose from – click the “upload” button with an arrow pointing up at the top right corner of the screen next to “search”. After uploading your plugin file, enter its name in the text field below it with a comma after each word.
To install a plugin in WordPress just click on the “Plugins” tab at the top of your dashboard. You will then be able to search for and find plugins that you would like to add to your site.
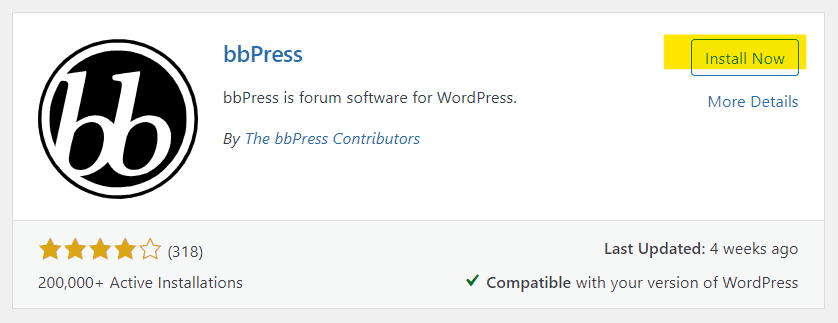
Click on “Install Now” and follow the instructions for installation. To activate any plugin, go back to Plugins tab, select Activate next to plugin name and follow the instructions.
How to Install and Activate WordPress Plugin to your Blog-
WordPress is a popular content management system that enables you to easily create a website or blog from scratch. It also provides a wide range of features and plugins that can be used to extend the functionality of your website.
In this article, we will show you how to install and activate a WordPress plugin to your blog. We will also explain how to install WordPress plugins using an automatic installer.
First, you need to go to the plugins area by clicking on the ‘Plugins’ menu at the side-bar on the left of your Blog’s Dashboard page.

You will be directed to a page where you can see all of your installed plugins, including default WordPress plugins.
To install a new plugin, you need to click on the ‘Add New’ button at the top of this page.

You will be directed to a page where you can search for plugins by name or keyword.
To install a WordPress plugin using an automatic installer, you need to first download the plugin installer file to your computer. After that, you need to click on the ‘Upload Plugin’ button located at the top of this page.
After that, you will be able to select the plugin installer file from your computer using the browse button. Then click on the ‘Install Now’ button located at the bottom of this page. This process can take a few minutes, so please be patient.

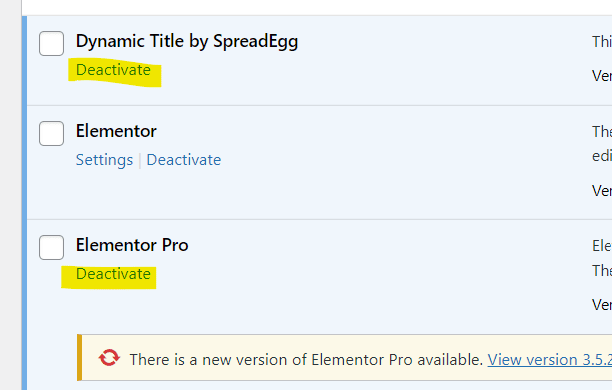
After the plugin is installed, you will need to activate it. To do this, you need to click on the ‘Activate’ link located below the plugin’s name.
You can also deactivate a WordPress plugin by clicking on the ‘Deactivate’ link below the plugin’s name.

In this tutorial, I am going to show you how to install and Activate WordPress Plugin. Many people apparently find it difficult to learn how to use a plugin on a blog. In reality, it’s very easy.
Firstly, browse the Internet for the desired plugin that will fit your needs then download it (the latest version is always best). After the download is complete, unzip the plugin folder and open it.
You will see a file called “readme.txt.” This file includes installation instructions, but I’ll give you a quick overview here.
If the plugin folder already exists in that location, overwrite the old files.
Then, log into your WordPress admin area and navigate to “Plugins.” You will see a list of all installed plugins on the right-hand side of the page. Click “Activate” next to the plugin you just uploaded.
Steps to install and Activate wordpress plugin –
Now that you have downloaded the plugin, it is time to install and activate it.
- Install the plugin by going to Plugins > Add New in your WordPress dashboard and uploading the plugin file.
- Activate the plugin by clicking on the Activate Plugin button.
- You will now see a new menu item in your Dashboard called “Plugin name” or “Plugin Name Documentation.” This is where the plugin’s documentation resides.
- You will also see that a new menu item has been added to your WordPress site titled Plugin name along with an Activate link if you are logged in as administrator of the site. If you are not, click on the View link to see the contents of the menu.
- To use the plugin, you need to configure it by following the instructions in the documentation.
- If you want to customize the plugin, do not edit the plugin files directly. Make a copy of the folder, change the name appending -custom, and put it in the wp-content/plugins directory. To activate your custom version, go to Plugins > Installed Plugins in your dashboard, deactivate the original plugin, and activate the custom plugin.
- If you want to contribute to the development of the plugin, go to the plugin’s GitHub page and follow the instructions there.
Quick Links
- How To Install And Configure WP Super Cache WordPress Plugin
- Best WordPress CRM Plugins in 2021: The Ultimate Comparison!!
- How To Install And Configure WP Super Cache WordPress Plugin
Conclusion- How To Install And Activate WordPress Plugin To Your Blog 2025
If you’re new to WordPress, it can seem a little intimidating. But there’s no need to be intimidated! With just a few clicks of your mouse and some brief instructions from us, we’ll show you how easy installing plugins on WP is. In this post, we’ve given the step-by-step process for installing and activating our plugin on your blog.
Now that you know what needs to happen in order to install our plugin onto your website, why not go ahead and start? You won’t regret it! And if you have any questions at all along the way or about anything else relating to blogging with WordPress, feel free to reach out anytime via email or phone call; We would love nothing more than help make sure.
Conclusion paragraph: As a blogger, you know that it’s important to keep your blog updated and fresh with new content. To do this, we recommend installing the WordPress plugin onto your website! You’ll be able to add images and text in any way you want through our easy-to-use platform.
We also provide image editing tools for when you need help making sure all of your photos are high quality and perfect before uploading them into the site! If you’re looking for more tips on how to get started blogging or improving what you already have going on, please contact us at [email protected] – we would love to hear from you soon.
That’s it! We hope this article has helped you to install and activate a WordPress plugin to your blog. If you have any questions, please feel free to ask us in the comments section below.
We would also like to remind our readers that we offer a wide range of WordPress services, including website design, development, and customization


