Install XAMPP And WordPress: If you want to make some use out of your website testing and development, installing WordPress on the computer is one of the best ways.
When you locally install WordPress on your computer, you instantly get the capacity to test themes, new releases, plugins and code updates before using them in production.
So, there is this free application called XAMPP that allows you to create a local WordPress environment. How? Read along!
Table of Contents
What Is The Use of Installing WordPress Locally?

Why should you even try to install WordPress on your computer? And why just locally? You could have newly installed updates on your live website and saved so much time.
Here’s a good reason for you to keep WordPress downloaded locally.
Any experienced WordPress user would tell you that having installed WordPress on your computer and not just running the updates, would save you from that risk.
This is because when you update or install updates, there is always a possibility of your website crashing down. Even the thought of that gives me a headache!
Find some reasons why people are installing WordPress Locally on their computer here.
- Website staging: You can use your local WordPress website as a WordPress staging site. When you have made the modification you want, you can always push it to your live website.
- Testing: When you have a local installation of WordPress, you can always safely test upgrades, tweaks, and other such customizations.
- Offline access: A local WordPress website doesn’t need an internet connection. You can set it up to test a website online that can be accessed from anywhere in the world. So even when you’re traveling or working in a remote area, there will be no fear of not being able to work because of connection problems.
- Development: A local version of WordPress is a perfect place to create and modify all the WordPress plugins and themes.
- Security and privacy: A WordPress website is installed online, whereas a local WordPress installation is accessible only to you on your computer. So you can be damn sure that you are safe and secure with your website.
- Speed: Obviously, the local installation runs faster than its online counterparts.
These are just a few out of those many reasons you should have a local installation of WordPress on your computer.
What’s this XAMPP?

To run WordPress, you need to make sure you have the following open source applications installed on your computer.
However, with the XAMPP application, you can be sure that your WordPress would be downloaded without all these three apps mentioned above.
You can also use this app it to install other website solutions like Joomla, PrestaShop, PHPBB, OpenCart and Drupal, and many more.
XMPP stands for Cross-Platform, Apache, MariaDB, PHP, and Perl. It’s cross-platform. It is seen to be working on multiple operating systems.
Users and developers have so many options if they have this application.
You can read more or find help here at XAMPP’s community forum.
How to Install XAMPP on your Computer?

XAMPP is open-source software that can be downloaded for free. Because it is a cross-platform application, it is available for windows, Linux, Mac, and the Solaris operating systems.
You could download various versions of XAMPP with PHP for each operating system. It will come with multiple add ons which enable you to install popular applications on top of the XAMPP.
- The various OS’s layout would vary, but the essential thing remains the same for OS – Linux, Solaris, and Mac.
- Start with downloading the XAMPP version that fits your needs the best and then doubles click the .exe file.
- Select the server and program language components that you want to install. All parts are at first selected by default.
- Define the installation folder’s location where XAMPP will be installed, which would later be the site of installation of a WordPress site.
- You will find a short note about the Bitnami application here. But that’s another article altogether.
- You can start working on the XAMPP once you have completed all steps.
- It would take just a couple of minutes for everything to get done, unpack all the files and install them on the computer.
- XAMPP might get flagged by an anti-virus, so make sure you give it access. The file can be downloaded in English or German.
- There, you’re done!
The control panel might be a little daunting at first, but it gets simpler once you start working with it and figure out where everything is.
- On the left, you would see the module components that are already installed. At the right, there will be actions mentioning: Start, Config, Logs, and Admin. The admin action buttons would be in grey until the belonging modules get running.
- There would be links to useful functionalities such as control panel configuration area, command shell, file explorer, services, and Netstat utility tool on the far right-hand side.
- From the beginning to the end, the installation process should not take more than a few minutes.
- To install WordPress with Bitnami, you need to get Apache and MySQL services running. To do that, you will have to click on the start buttons of each module.
- XAMPP remains on your window taskbar until you click on the quit button. When you right-click the XAMPP button, you can switch modules on and off. You get to quit XAMPP from here as well.
- By typing localhost into the browser’s URL bar, you can check if your server is running perfectly. When you do that, you should see the XAMPP welcome page that includes all the technical details of your installation.
- So now, after Apache and MySQL have been installed, you can start to install WordPress as well.

Setting up WordPress using XAMPP Manually
Bitnami is the best and easiest method to instal WordPress, but you should also know the manual process.
There are three steps:
- Create your WordPress database
- Download WordPress
- Install WordPress
Creating Database

You can create your database at phpMyAdmin app that gets installed with XAMPP. To access it, you have to click on the admin button from the MySQL module.
- The phpMyAdmin app will automatically load on your browser.
- Click on the databases tab, enter a name for your WordPress database and click on the create button. Make sure you remember the name for the WordPress installation wizard later on.

- You don’t have to create a database user when using XAMPP.

Download WordPress
Download WordPress directly from here. After this, extract the ZIP file to unpack the WordPress folder.

Go to your htdocs folder after this – within your main XAMPP installation folder. While using Windows, if you didn’t change the XAMPP installation folder’s location during setup, the htdocs folder would automatically be located at C:xampphtdocs.
You should create a new folder for your local WordPress site within this folder. Copy the contents of the WordPress folder you extracted from the zip file into this new folder.
Install WordPress
In order to run the program, you will have to access your new WordPress website.
- First, select the website language from a dozen other options that WordPress gives.
- Next, the installer notifies that you will need your database connection information for the wizard.
- Enter the database connection details and your WordPress database name, username, password, host, and table prefix that you want to use for the WordPress tables.
- If you have forgotten your database name at this stage, you can log back into phpMyAdmin from the XAMPP control panel and observe it here.
- The database user name is to be set as root, and the password should be left empty. The host should remain as localhost. Changing the table prefix is worth doing if you plan to create multiple WordPress websites in your local environment.
- You will then be asked to run the WordPress installation wizard.
- When you’re reading, click the Install WordPress button.
WordPress has now been installed locally on your computer, and you can start the login to your new website.
Wasn’t it as easy as eating a bowl of soupy noodles?
Oh, talking about that, I’m going to get some!
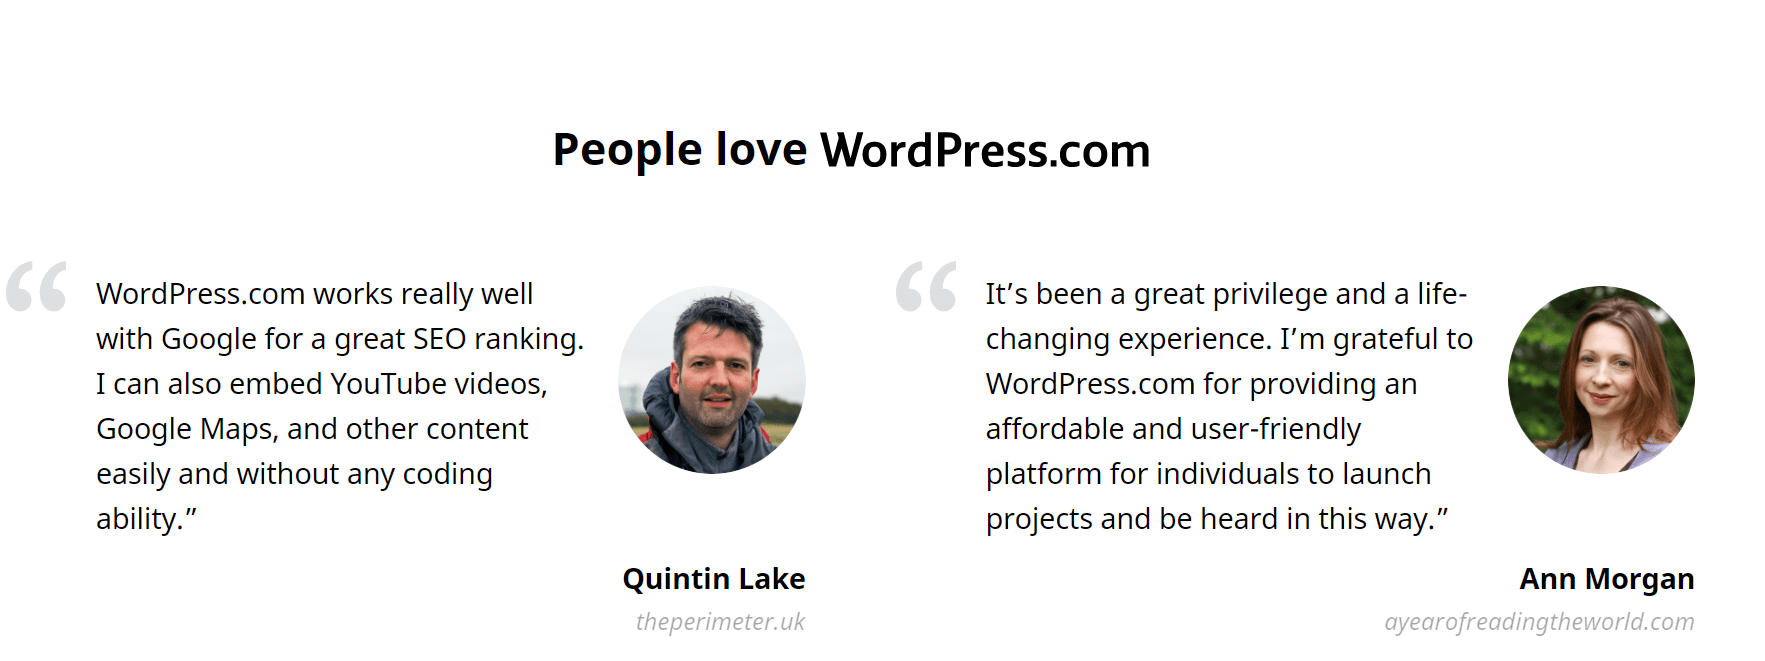
Customer Review| Install XAMPP And WordPress:
Quick Links:
- How To Create A Slider In WordPress?
- How To Create A PopUp In WordPress?
- How To Create A Slider In WordPress?
FAQs | Install XAMPP And WordPress
✔How do I pay for plans?
You can pay for your brand new WordPress.com plan, add-ons, and domains in the Store checkout using any major credit card, debit card, or PayPal.
🌹Can I cancel my plan?
Purchases made on WordPress.com can be canceled and refunded during the refund period. You can also unsubscribe at any time if you don’t want your subscription to renew.
🔥Does my plan auto-renew?
Plans and domains renew annually and we take care of everything. We charge your account one month before the end of the subscription period. If your payment information needs updating, we’ll let you know.
👌What is xampp used for?
XAMPP is an abbreviation for cross-platform, Apache, MySQL, PHP and Perl, and it allows you to build WordPress site offline, on a local web server on your computer. This simple and lightweight solution works on Windows, Linux, and Mac – hence the “cross-platform” part.
😍Is xampp server free?
XAMPP is a completely free, easy to install Apache distribution containing MariaDB, PHP, and Perl. The XAMPP open source package has been set up to be incredibly easy to install and to use.
🎉How do I know if xampp is working?
Open the XAMPP control panel and start the apache module. Open your browser and type localhost/Test/test. php in the URL tab. If your browser prints 'XAMPP Server runs successfully', it means XAMPP is successfully installed and correctly configured.
👀What is premium theme?
Premium themes are paid themes with exciting options for customization and exclusive support from theme authors themselves. Choose the Premium Plan or Business Plan for unlimited Premium Themes.
Popular Videos:
WordPress On Social Media:
Getting Started with the Figma WordPress Design Library https://t.co/kEuraVwZAr
— WordPress (@WordPress) April 28, 2021
Become an early adopter of the Gutenberg Plugin. https://t.co/4jJSYww8r7
— WordPress (@WordPress) April 21, 2021
Our latest edition of People of WordPress coincides with International Women’s Day. This month we feature website developer and #WordPress contributor Olga Gleckler. #WebDeveloper https://t.co/LuSkAH1ZlW
— WordPress (@WordPress) March 8, 2021