
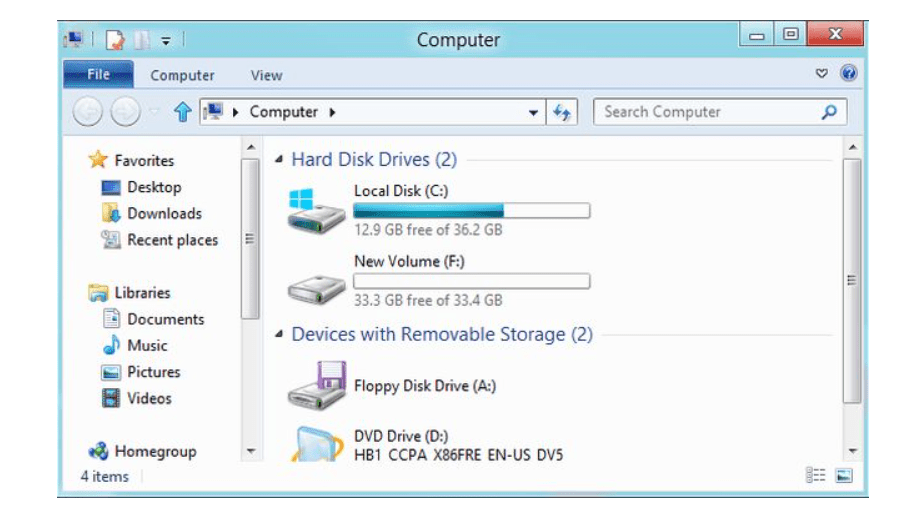
Open My Computer on your system, what did you see??
Probably multiple drives, written Local Disk over it?? Um, correct, but you are missing out on something. You just ignored the English letter written on each drive following the word Local Disk!! These letters we often know as the drive letters.
The purpose of the drive letter is simply to distinguish the drives from each other but do you know we can change drive letter windows 7, 8, or others??
Yes, we can easily do that and we will make you learn how to change the drive letters. The mainly used drive letters are C: D: E: and F: .
Very few people know that the series starts from C because the first two letters i.e A and B are reserved for floppies, however, we should not be discussing it here, our main concern for today is how to change the drive letter assignment in Windows.
Imagine how cool your drive will look with drive letters X:, Y:, Z: or any letter of your choice? If we have got an option for changing the drive letter, then why stick to something boring and regular??
Well, you no need to bear with the old drive letters at all. Just head over to the guide and learn how to rename or label a disk drive!
I can assure you, it’s just a two-minute process and very simple. People, most often, don’t use this option just because of a lack of knowledge. But today, you’ll get to learn about changing drive letters on windows and can teach others.
How to Change Drive Letter in Windows:
To change the drive letter of USB flash drives, hard drives, DVD drives, or other drives attached to your system, you need to follow few simple steps.
The process is substantially the same in all the windows but the below guide is specifically composed keeping Windows 7, Windows XP, and windows vista in mind.
And the screenshots given along are taken from Windows 7.
Step 1. The very first step is to reach out to My Computer. The shortcut icon for my computer would be on your desktop, or you can get it in the start menu.
Step 2. Now right-click on it and select Manage, the third option from the top in most of the windows. The screenshot for the same is given below.

Step 3. As sooner you click on Manage, the Computer Management window will pop up. Now in the left pane, click on Disk Management under Storage. If you can’t find the option, refer to the below screenshot.

Step 4. On clicking Disk Management in the left pane, the right side of the window will load with the drives available on your computer. Now right-click on the drive you want to rename and select Change Drive Letter and Paths…. Similar to the above screenshot.
Step 5. As sooner you click on Change Drive Letter and Paths, a new pop-up window will open up containing three options Add, Change, and Remove. All these options have their own role which can clearly be understood by their names. But to be more specific, I’m writing down the details.
- Add: If a drive has not been assigned any letter already, you can assign one by clicking on the Add button. Just select the letter you want to assign to it and click on Ok.
- Change: The Change letter is to rename the drive, the option this article is all about.
- Remove: The remove option is obviously to remove the letter from the drive. Just click Remove, confirm the process and you are done.
Step 6. By now you must have understood, the option we are going to use is Change, just click on it.
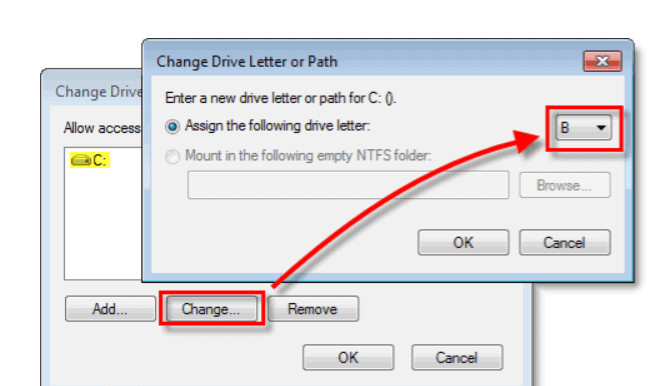
Step 7: Now in the new pop-up window, select the letter you would like to assign to the new drive, and click Ok. See the screenshot in case of any doubt.
Step 8: On clicking ok, you will see a warning message saying,
“Some programs that rely on drive letters might not run correctly. Do you want to continue? ”
You can ignore this message and click Yes.
Step 9: If all the programs belonging to that drive(we are trying to change the letter of) are closed, the process will get accomplished successfully and you won’t face any issues.
Else, you will see the warning message.
Step 10: Now click No if you know which programs are open, navigate to those programs and close them. Restart the process and change the drive letter. Else, click on Yes, restart your computer and follow all the steps again.
Note: Remember, windows do allow us to change the drive letters but it is highly recommended to stay away from drive C, the main drive on our computer. This drive is considered as main because it contains all the important software of our system specifically the windows. If you will try to change the name of this drive, all the software may get confused in the path and can cause an error. So for the proper functioning of your computer, don’t get your hands onto C drive.
If you are a windows 8 user and want to know how to change a drive letter in Windows 8, no need of getting panic. I’ve described the method for windows 8 users below.
To change the drive letter in Windows 8, you need to go to Disk Management like on Windows XP, 7, and vista. Just the path to reach it is different.
Right-click on start button> Disk Management
Alternately, you can go to disk management windows by searching it in the search bar on the start menu.
The best thing about it is being it’s extremely simple. I hope the guide came out in handy for you and served its purpose. If you felt any difficulty in any step of the guide, feel free to drop a comment, we are just a click away!
Quick Links –

