Today is the last and final installment of the how-to make a bootable USB article series.
In the previous articles, we have seen how we can make a bootable disc on two of the most popular OS’s out there, Windows and Mac(click here).
However, there is a huge chunk of people out there who choose to use Linux as their primary OS.
Now things traditionally are and have been a little complicated for the Linux side of things.
However Ubuntu gaining publicity as a mainstream OS, things have gotten a little easier for those users looking to dip their toes into Linux but are not as comfortable with command lines and would rather have GUI support!

Creating a bootable Pendrive on Linux has two main procedures
Pre Requisites
- 8 GB Pen drive.
- A working computer and an internet connection.
- You will also need Admin privileges on the computer.
- An ISO file of the operating system has to be made into a bootable disc.
- The disc needs to be formatted before loading the operating system into it, so if you have any files you’d like to keep that are in this Flash drive then be sure to back them up before you begin with the process!
That’s all you need except for a spattering of common sense which I’m sure you’d have! So let’s get on with it, shall we?
Creating a Linux Bootable USB
Step 1
Insert a USB stick into the computer
Step 2
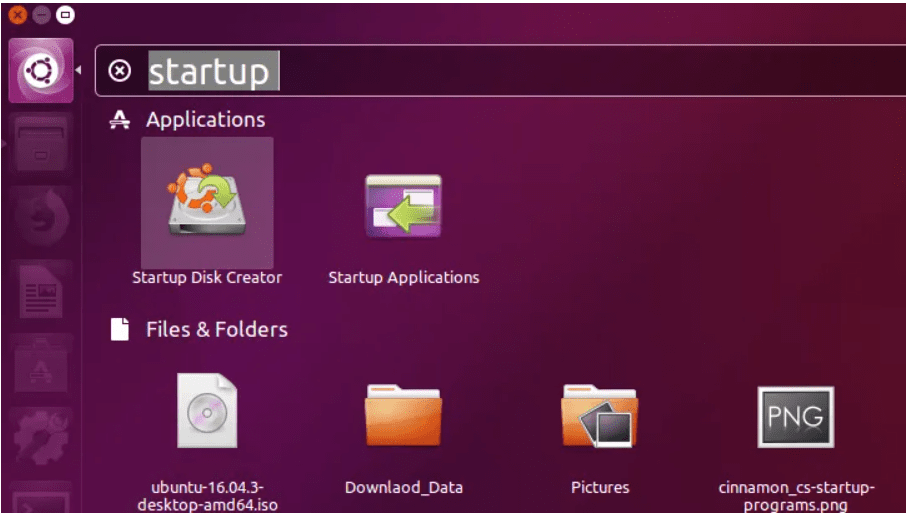
Open the dash and click to open the Startup Disk Creator app

Step 3
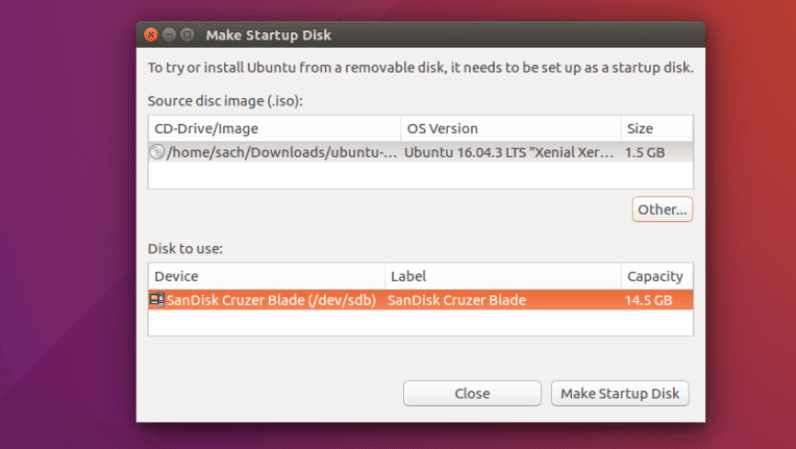
Click on ‘Other’ and choose the ISO file that you’ve downloaded. Select the file and click on ‘Open’ in the lower right corner of the window.

Step 4
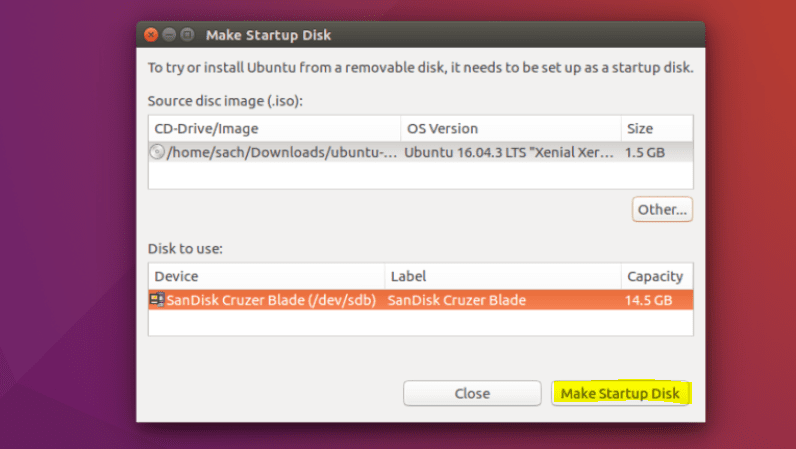
Select the USB stick as the destination in the disk to use a box and click ‘Make Startup Disk’.

Step 5
That’s it! When the process completes, you’ll be ready to restart your computer and begin installing Ubuntu.
Making a Windows Bootable Disk
even other Linux distros as long as GParted and GRUB are installed.
Install GParted and GRUB on Ubuntu with:
sudo apt-get install gparted grub-pc-bin p7zip-full ntfs-3g
For BIOS With MBR Hard Drive
Rewrite the partition table as MS-DOS and format your USB drive as NTFS using GParted (also add the boot flag)
In GParted, right-click the USB partition and select Information. Copy the UUID somewhere as you will need it.
Copy all files from Windows ISO to a USB drive using your favorite file manager
Go to a USB drive and if the folder named boot has uppercase characters, make the all lowercase by renaming it
Install GRUB on USB: sudo grub-install --target=i386-pc --boot-directory="/<USB_mount_folder>/boot" /dev/sdX
/dev/sdX is the device (e.g. /dev/sdb, not /dev/sdb1
Create a GRUB config file in the USB drive folder boot/grub with the name grub.cfg
Write this into the file:
echo "Booting from USB <or whatever you want>"
insmod ntfs
search --no-floppy --fs-uuid <UUID_from_step_2> --set root
chainloader +1
boot
Unmount the USB drive and restart your PC. Choose the USB as the first boot device in BIOS and start booting from it.
For UEFI Mode (GPT) – 64-bit Windows Only
Using GParted rewrite the partition table of the USB drive as GPT.
Create a new primary partition and format it as FAT32.
Copy all Windows files to the USB drive
Look at the USB in the efi/boot folder. If there’s a file bootx64.efi then you’re done. The USB is bootable.
Otherwise, open sources/install.wim with the Archive Manager (you must have 7z installed) and browse to ./1/Windows/Boot/EFI. From here extract bootmgfw.efi somewhere, rename it to bootx64.efi , and put it on USB in efi/boot a folder.
If you’re making a Windows 7 USB, copy the boot folder from efi/microsoft to efi folder.
Don’t forget to unmount (safely remove) the USB drive.
Quick Links-


