Want to find how to install Google Tag Manager in WordPress?
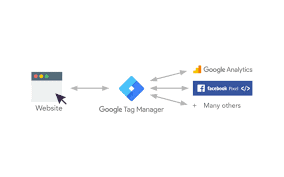
Google Tag Manager is an excellent tool to utilise if you wish to combine many analytics and marketing services on your WordPress site. It makes it simple to add and update numerous tracking codes on a website.
Google Tag Manager has a steep learning curve, however. You would need some time to learn how to use the tool. However, we will also discuss a solution that makes advanced tracking quite easy to set up.
Table of Contents
What is Google Tag Manager?

Frequently, website owners must add various code fragments to measure conversions, traffic, and collect more analytical data. Using Google Tag manager, you can add and manage all of these scripts from a centralized dashboard.
There are tag templates for Google Analytics, AdWords, and DoubleClick, among others. Tag manager is also compatible with a number of third-party monitoring and analytics services.
In addition, you can utilise custom HTML to add your own tracking code or any other code you like.
How do I configure Google Tag Manager with WordPress?
Now that Google Analytics is ready to be added, the next step is to configure Google Tag Manager.
1) Sign up for Google Tag Manager using the same Google account you used for Google Analytics.
2) After logging in, the screen to create a new account will load. Simply provide a user account name and click the proceed button.
3) Now, a container must be added to your account. A container may be a website or an application for iOS or Android. In this instance, we’ll utilise the web. You may use the domain of your website as the container’s name. Each account can have several containers. Once complete, click the create button to proceed.
4) Now that your Google Tag Manager account is prepared, you must add a new tag. This can be done by clicking the create new tag button.
5) You must initially select a tag product. There are currently over 20 accessible integration templates.
We will chose Google Analytics for the time being, but you can always add more categories and select alternative products based on your requirements. You may also click on custom HTML to include other code snippets.
Choose Google Analytics as your tag’s product.
After selecting Google Analytics, you will be prompted to choose between Universal and Classic Analytics. If you select universal analytics, you will be prompted for your analytics tracking ID.
This tracking ID is a specific code that Google uses to identify your website. You can retrieve this ID by accessing the Admin tab inside your Google Analytics account.
- Select the site’s account and property, then click on tracking info to enlarge it. You will see the link to the tracking code
- Clicking on the tracking code will take you to the tracking code page, where your UA tracking ID will also be displayed.
- Copy and paste your UA monitoring ID into Google Tag Manager. Under track type, select Page View, and then hit the proceed button.
- The tag configuration assistant will now ask when this tag should fire. Select each page before clicking the create button.
- Google Tag Manager will now display the tracking code that must be added to your WordPress website. You must duplicate this code.
Quick Links:
Conclusion
Adding Google Tag Manager to your WordPress website is a crucial step in effectively organizing and implementing different tracking tags and scripts. By adhering to the simple setup procedure described above, you can guarantee seamless integration without requiring frequent code modifications.
This allows you to monitor and evaluate user behaviour, maximise marketing initiatives, and successfully improve website performance. Accept the freedom and control that Google Tag Manager provides to optimize your digital marketing tactics and precisely accomplish your website’s goals.”


