Search Engine Optimization (SEO) is a way to make your website more visible on search engines like Google. When you do SEO right, your website can show up higher in the search results when people look for things online.
This can lead to more people visiting your site, which can then lead to more of those visitors taking action, like making a purchase or signing up for something.
Surfer SEO is a tool that helps content marketers make their website’s content better so it can compete with other websites in search results. When your content ranks higher in search results, more people are likely to click on it.
For example, the first result on a Google search page gets clicked on the most, followed by the other results on the first page. Hardly anyone clicks on results from the second page.
Luckily, with SEO, you can improve your content so it has a better chance of showing up higher in search results.
This is particularly important for blog posts or articles that provide useful information to people who are interested in what you have to offer.
Table of Contents
What is Surfer SEO?

Surfer SEO, or just Surfer for short, is a tool that helps writers, content managers, and agencies create better content for their websites. It’s designed to make it easier to understand and improve your website’s ranking on search engines like Google.
The main goal of Surfer is to make SEO (search engine optimization) easy to understand and use for everyone, whether you’re a small business owner, freelancer, or work for a big company.
When it comes to SEO, it’s not just about using the right words or getting lots of links. Surfer helps you understand all the different factors that affect how well your website ranks on search engines.
This includes things like keyword research, creating good quality content that people want to read, and making sure your website is set up in a way that search engines like.
Surfer also helps you keep track of how well your website is doing on search engines and gives you suggestions on how to improve it even further.
It’s like having a personal assistant for your website’s SEO needs, helping you make the most out of every piece of content you create.
Why do People Love Surfer SEO?
Check out what people are saying about Surfer! In the SEO Surfers Facebook group, members share their success stories, get help with their questions, and connect with others in the community!
As a regular user of Surfer SEO, I love it because it makes SEO easy to understand and implement. It helps me optimize my content, improve my website’s ranking on search engines, and connect with a supportive community of fellow users.
Plus, it’s always being updated with new features to make SEO even more effective!
Create a Content Strategy in Minutes
Surfer makes it easy to plan your content strategy. It helps content marketing teams save time, energy, and resources by streamlining the process.
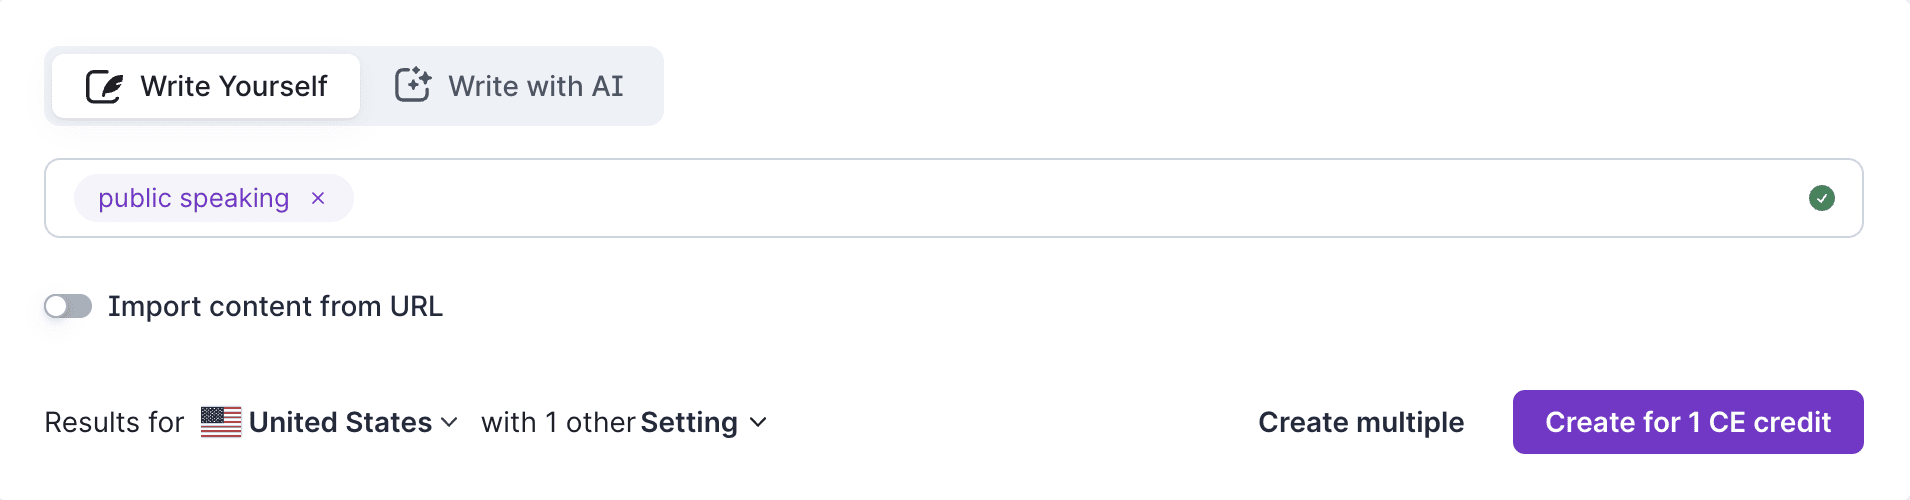
When you’re ready to start creating content, Surfer’s Research Tool is the perfect place to begin.
How I Use Surfer’s Keyword Research Tool:
Keyword Research is a super important tool in SEO that helps you find the best keywords to use in your content.
Imagine you’re creating a blog for your online shop. There are tons of topics you could write about, but which ones will bring in the most visitors?
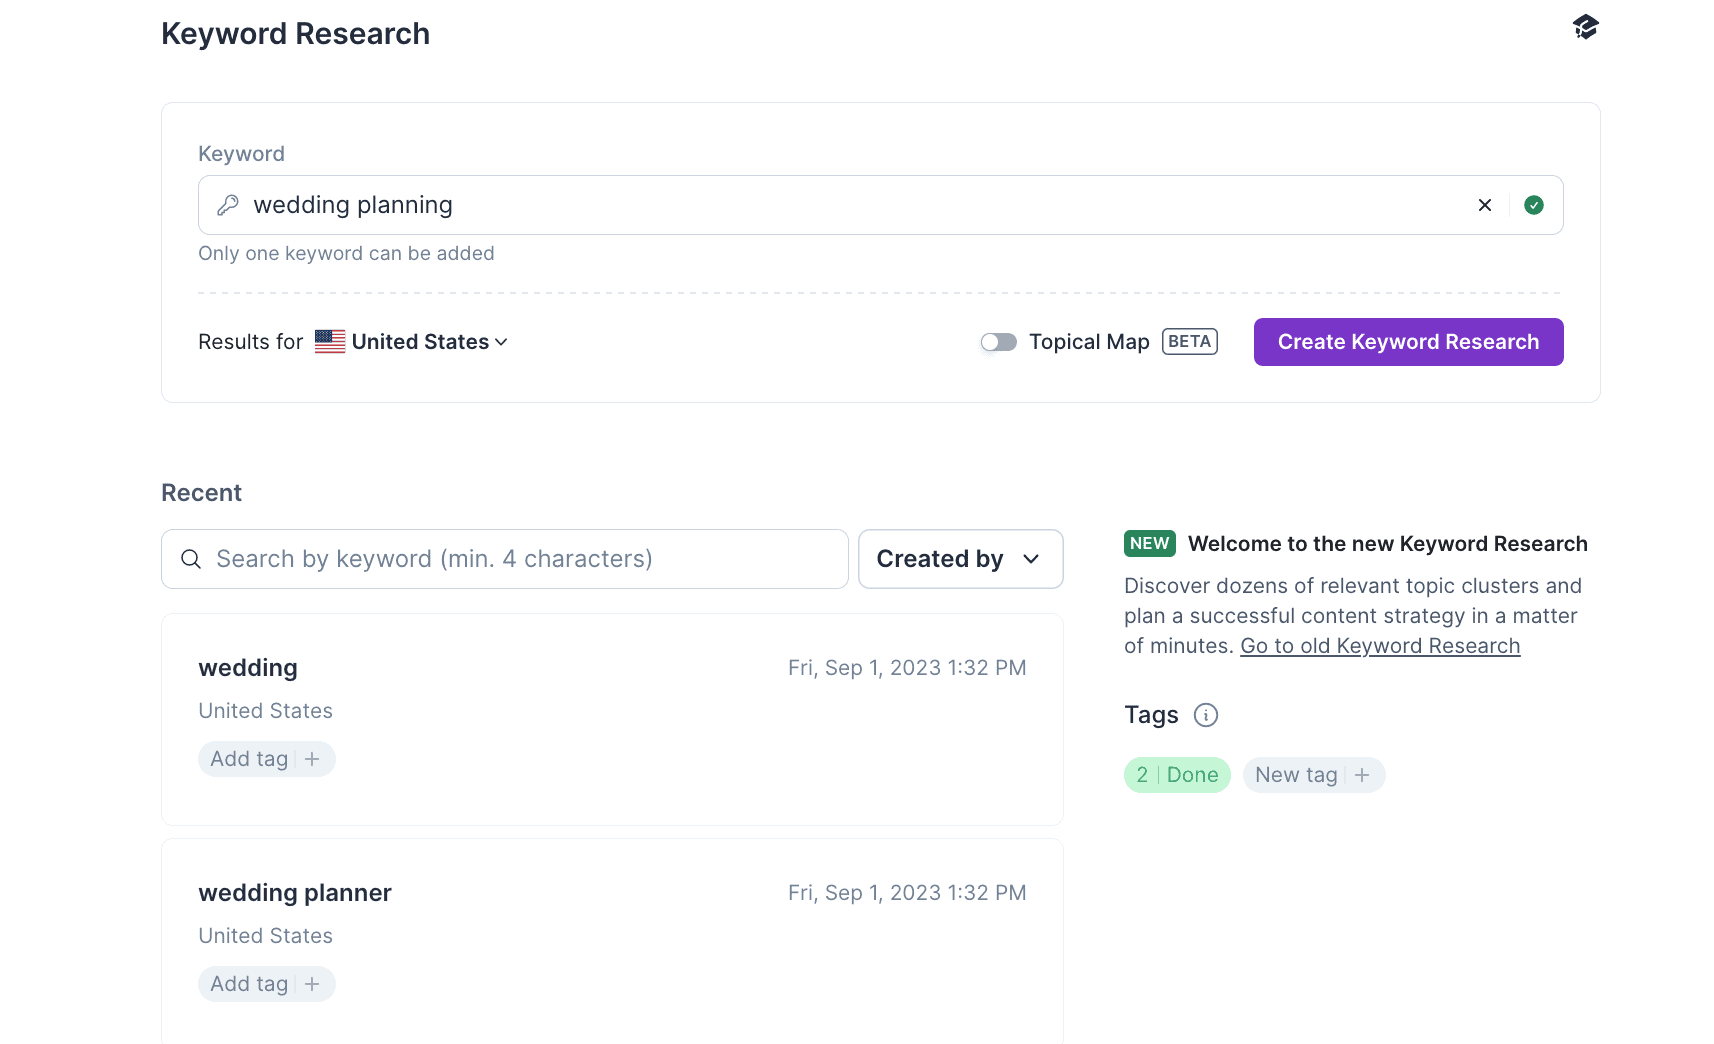
That’s where Keyword Research comes in. You start by entering your main keyword, like “wedding” if you sell wedding-related items.
Keyword Research shows you how much traffic you could get by writing about different topics related to your main keyword. It also helps you understand what people are searching for when they type in that keyword.
Understanding what people are looking for is crucial because you want your content to match their needs. For example, if someone is just looking for information, you don’t want to try to sell them something right away.
With Surfer’s Keyword Research, you can also find other keywords related to your main one, which helps you build up your website’s relevance. Plus, you can see how hard it will be to rank for each keyword before you start writing.
Once you’ve picked a topic, you can jump right into writing using Surfer’s Content Editor. It’s like having everything you need to create awesome content all in one place!

What is keyword difficulty?
Keyword difficulty is a measure of how hard it is to get your content to show up on the first page of Google. It’s important because being visible on Google’s search results page is how you get noticed by the people you want to reach.
To figure out how difficult a keyword is, Surfer looks at a few things like what people are searching for, who your competitors are, how strong your website is, how many other websites link to yours, and how good your content is.
Keyword difficulty isn’t just about how many people are searching for a keyword. It’s about being smart and picking the right keywords to focus on.
With Surfer’s Keyword Research, you can not only see how hard it is to rank for a keyword, but also how hard it is specifically for your website. When you connect Surfer to your Google Search Console, you get even more insights about keyword difficulty based on your website’s strength.
And the best part? With just one Keyword Research query using your main keyword, you can plan out months’ worth of content in no time.
You can create your main page and all the other pages that support it with just a few clicks!
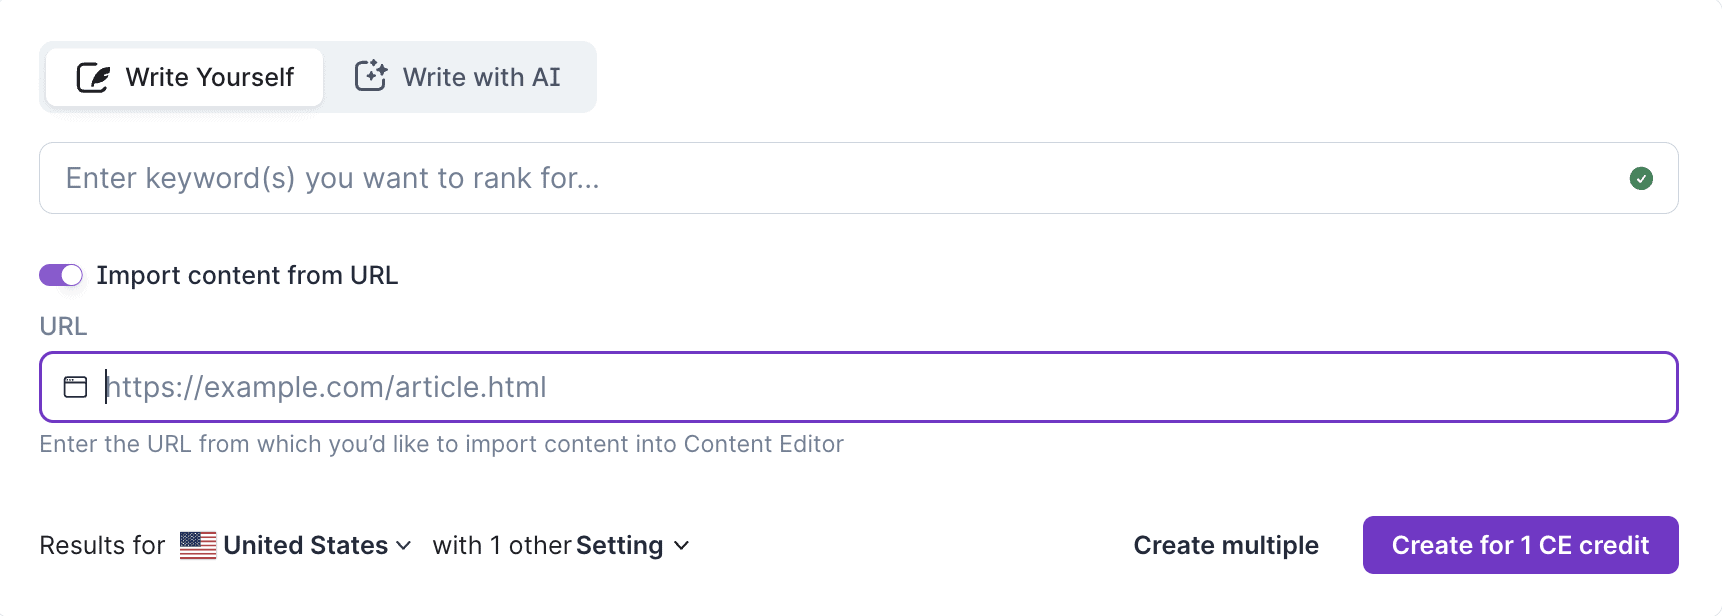
How to use Surfer’s Content Editor?
To start using the Content Editor:
- Enter 1 to 5 main keywords.
- Choose your country and which device you want to focus on.
- Click the Create button.
Hot Tip:
When setting up Surfer’s Content Editor:
Stick with the default choice of using the mobile crawler, as Google prioritizes mobile-friendly websites. But you can switch to the desktop if you prefer.
Once you’re in, you can start writing right away. But if you want, you can customize your guidelines by clicking on the “Customize” button at the top right corner.
Organic Competitors are the top 10 (or up to 20) pages that rank for your main keywords in the chosen search location. These competitors will influence your guidelines. Surfer automatically picks the top 5 pages with the highest Content Score.
You need at least 3 unique domains in the Organic Competitors list. If there are fewer than 3, contact Support to restore credits and create a new Content Editor with different keywords.
Make sure to review other sections like Content Structure and Terms for additional insights.
Hot Tip:
When you adjust the recommended ranges in Content Structure, be cautious. The more you change them, the harder it might be to get a high Content Score. That’s because straying too far from the recommended ranges might not align with what Surfer suggests as optimal.
In the Terms section, you can manually include or exclude recommended keywords. These keywords are listed in order of importance, with the most critical ones at the top.
Remember, you can also manually add keywords to your guidelines by clicking the ellipsis button on the right side of the section.
The Content Score gives you a quick idea of how well your article is optimized. It’s a dynamic number that considers various factors, which can be grouped into the following categories:
Try to achieve a score in the green, which is above 68. But once you reach this minimum standard, don’t get too focused on chasing higher numbers.
Instead of striving for a perfect score on one article, it’s more effective to spend your time writing multiple well-optimized articles.
You can easily share access to a Content Editor with others, even if they don’t have a Surfer subscription. Just click on the purple share button to generate a shareable link.
It’s important to generate the link using this button; copying and pasting the URL from the top of your page won’t do the trick.

Here’s a helpful tip: Before sharing the Content Editor link, make sure to set it up the way you want by customizing it through the settings menu. People who use the shared link won’t be able to change any settings themselves, so it’s best to have everything set up beforehand.
Also, if you use Google Docs, you can download a Chrome browser add-on that lets you apply Surfer’s guidelines directly to your document.
And if you’re using WordPress, you can export content directly from Surfer using their integration. This makes it easy to transfer optimized content to your WordPress site without any hassle.
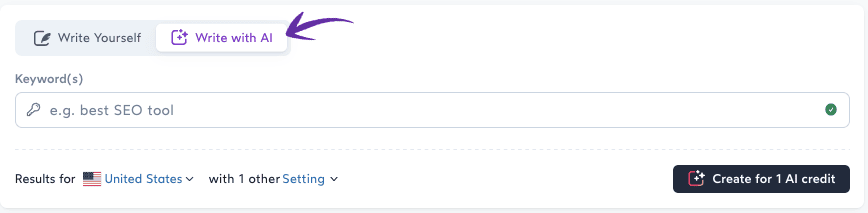
How to use Surfer AI?
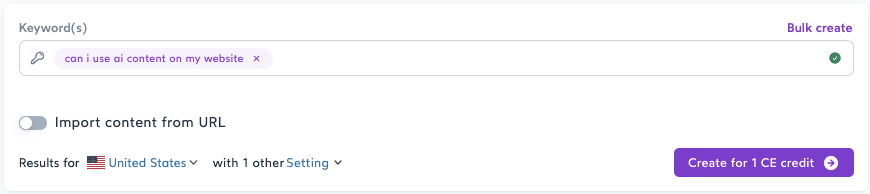
To start writing articles with Surfer AI, go to the Surfer Content Editor and click on the “Write with AI” tab. This is where you can begin using artificial intelligence to help you create your content
Select your target keywords
To start writing your article, first, decide on the main topic or primary keywords. If you’re not sure which keywords to use, you can use Surfer’s keyword research tool to help you. Here’s how to get started:
- Enter 1-5 primary keywords that best represent the topic of your article.
- Choose the country you’re targeting and specify whether you want to optimize for mobile or desktop devices.
- Click on the “Create” button to begin.
Following these steps will set up the Content Editor for you to start writing your article.
Once you’ve created your article in Surfer’s Content Editor, a window will pop up. This window will ask you to choose some settings for your article. You can adjust these settings to customize how your article will be optimized for search engines.
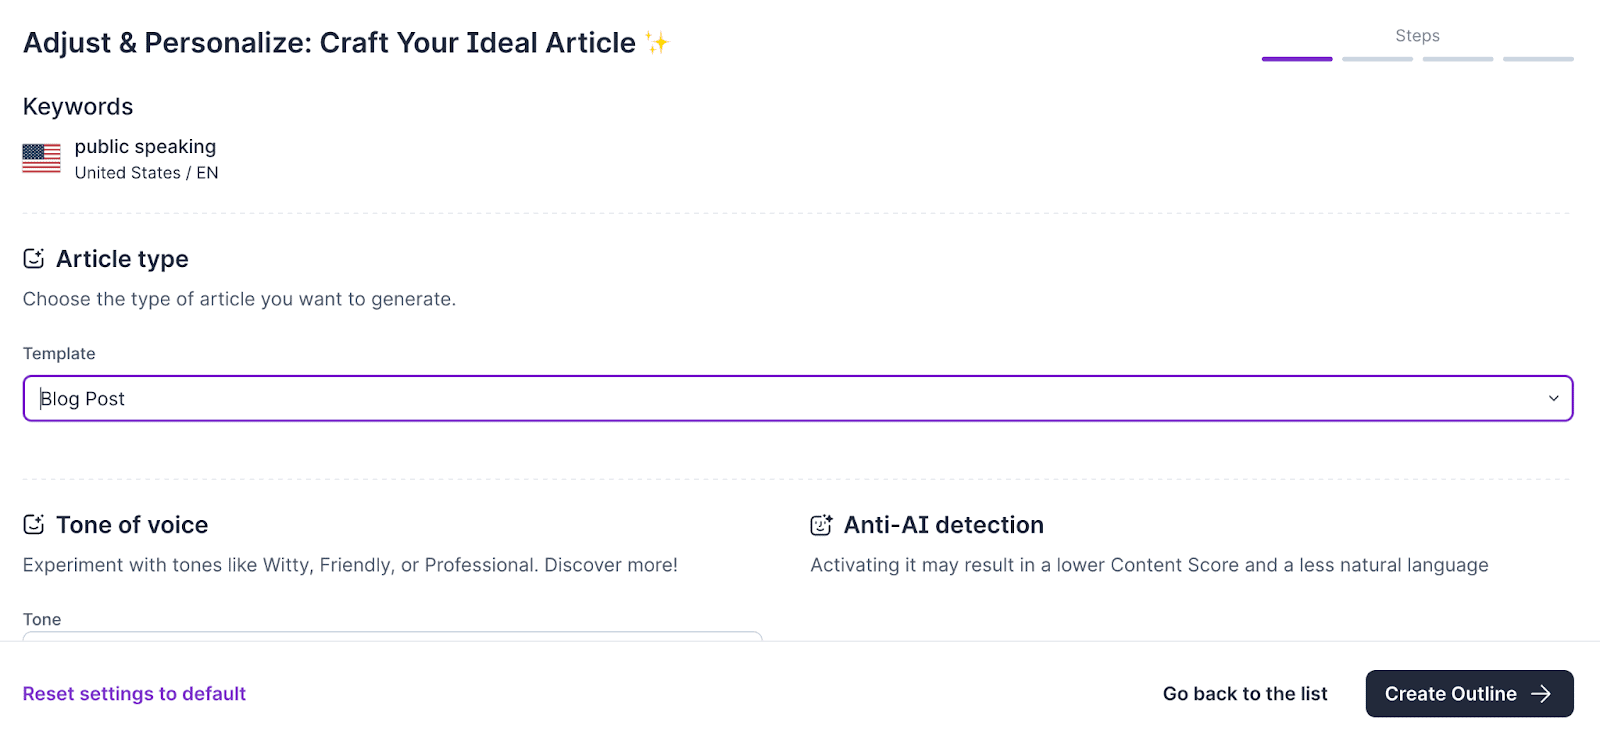
You’ll see a new window divided into four parts, guiding you through the settings for your article before Surfer AI writes it. At the top, you’ll find the keyword and location you selected.
Select your content format
Surfer AI will give you three choices to pick from.
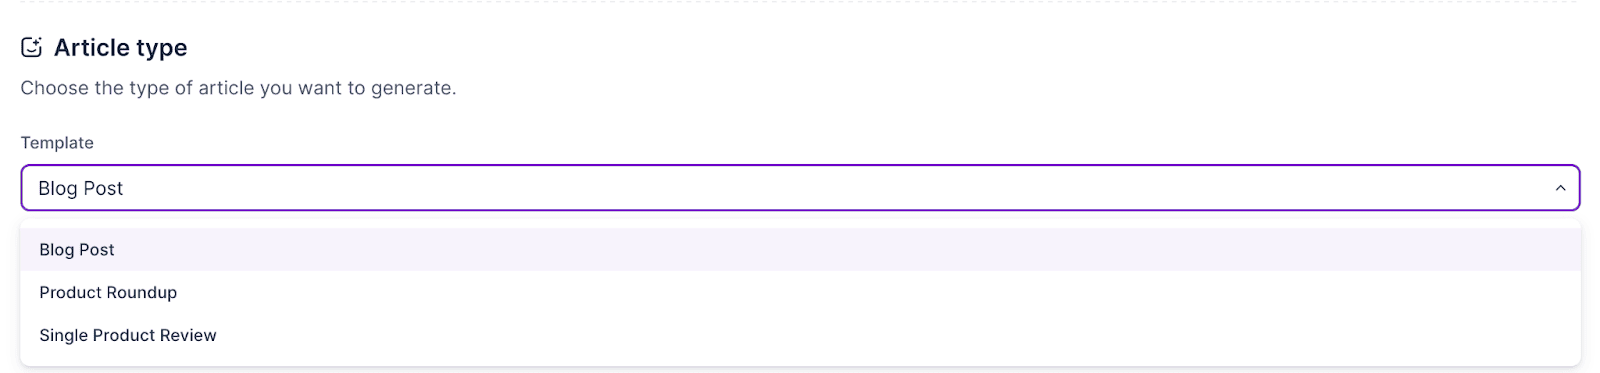
- Choose “Blog Post” if you want your content to be created in a format suitable for a blog post.
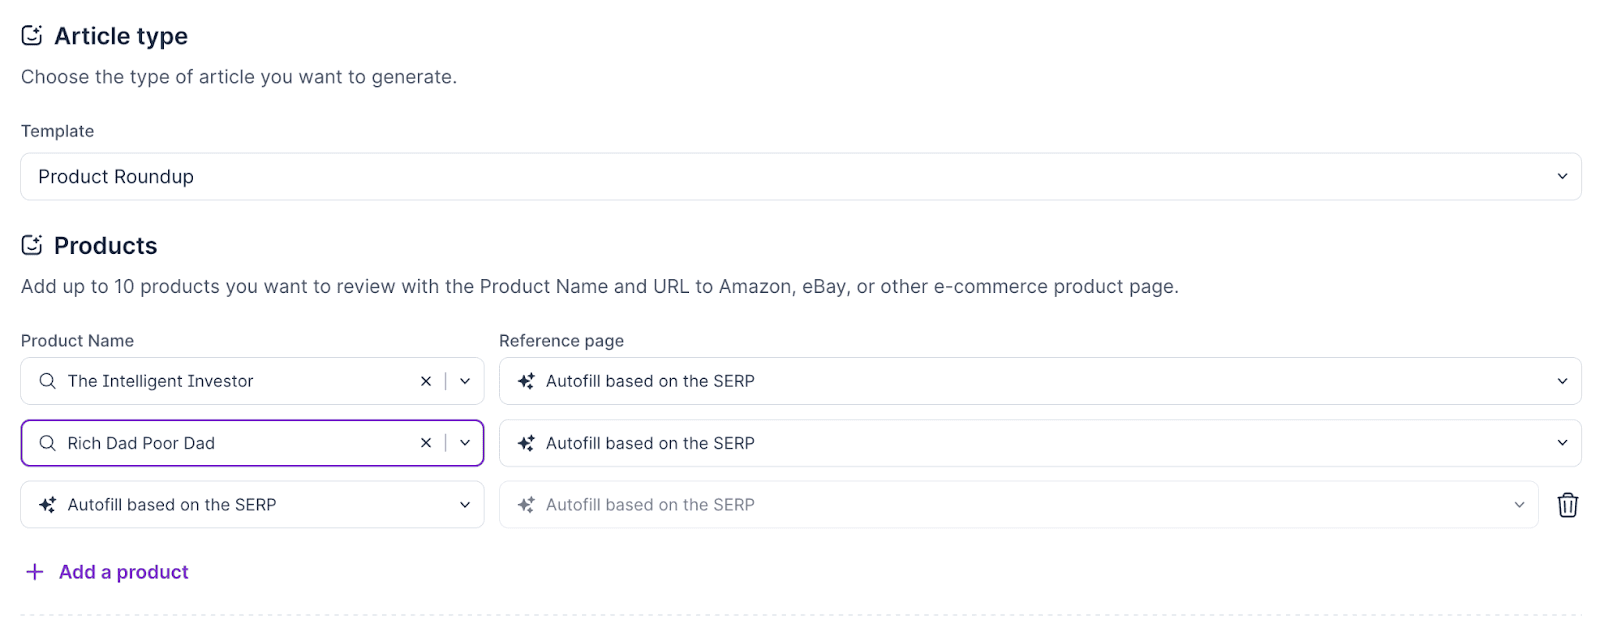
- Select “Product Roundup” if your article is a listicle featuring various tools or products.
For instance, if you’re writing about the “best books to learn about investing,” you might want to select a few books yourself and let Surfer analyze the search results to suggest additional options.
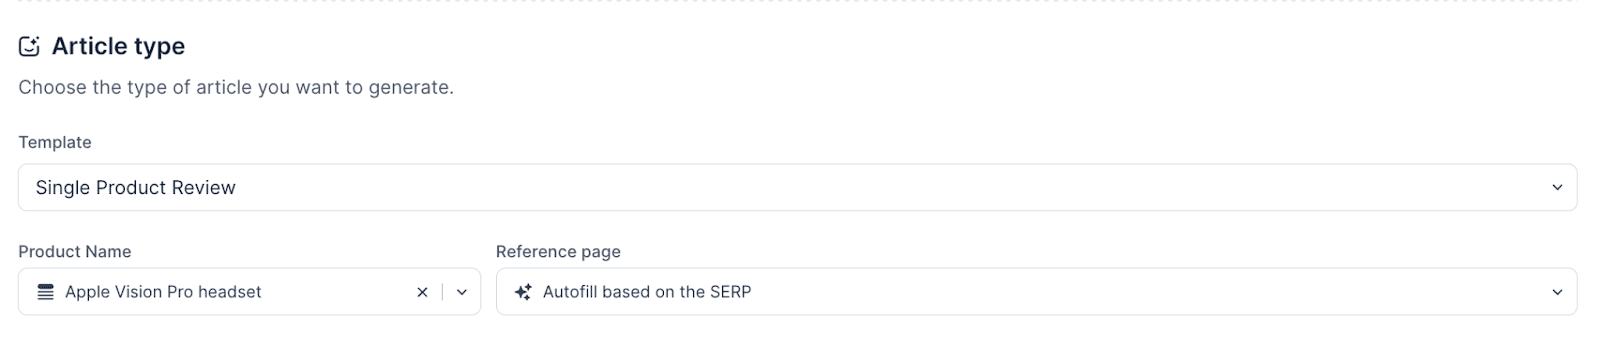
Choose “Single Product Review” if you want Surfer AI to write a review about a specific item or product. This option is suitable when you want to provide a detailed evaluation of a particular product, sharing its features, benefits, and your opinion about it.
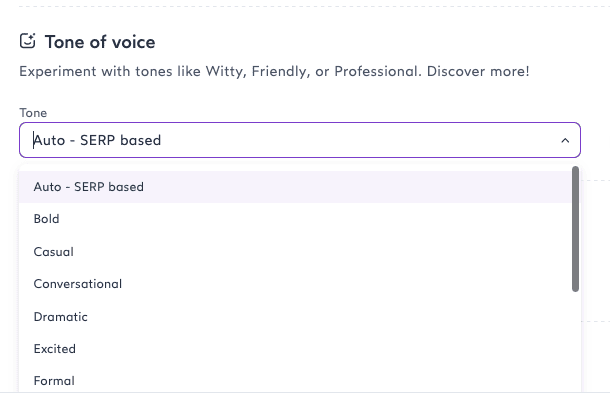
Select Your Tone of Voice
You can pick a voice from the dropdown menu that matches your content’s style. This tells Surfer AI to follow your brand’s tone while writing your blog post. If you’re unsure, you can leave it on Auto, and Surfer AI will mimic the tone used in the top search engine result pages (SERPs).
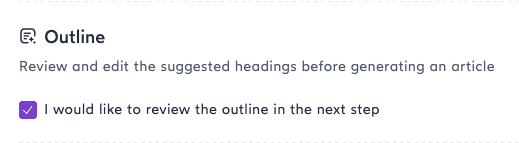
Edit Your Outline
In the next step, Surfer AI will create an outline for your article. You can customize this outline to include your own ideas and organize the structure of your article. To make changes to the outline, just check the box as shown.
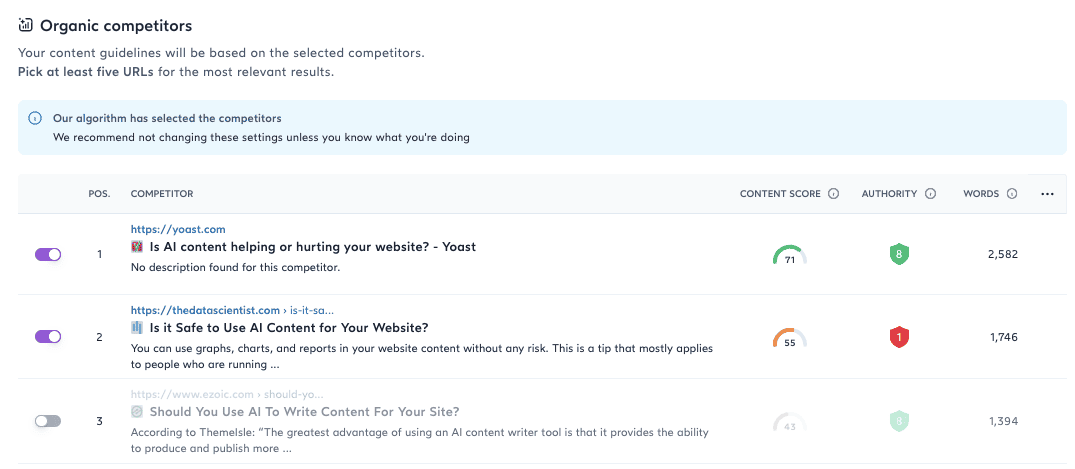
Confirm Organic Competitors
This feature allows you to select the top-ranking pages on Google for the keyword you’re targeting with your article.
Although Surfer’s algorithm selects the most relevant blog posts, you can make the final decision on which pages to compete against.
A minimum of 5 organic competitors is suggested.
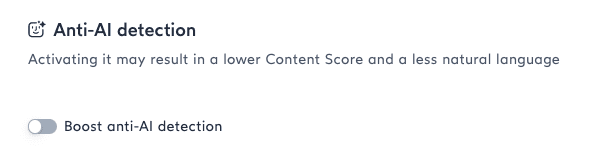
Avoiding AI content detection
My recommendation is to keep this feature turned off because Google accepts both AI and human-generated content as long as it provides value. Additionally, using detection tools that are often incorrect undermines the usefulness of hiding AI-generated content.
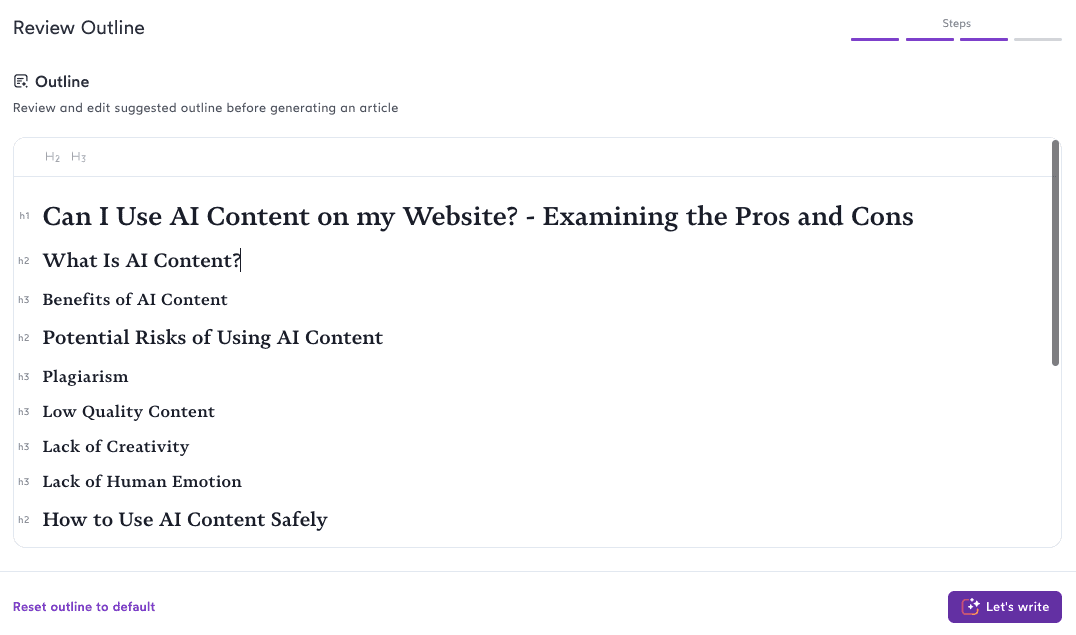
Once you’re satisfied with your settings, click on the “Create outline” button at the bottom. This tells Surfer AI to generate an outline for your article, which you can then edit before finalizing the content.
After a few minutes, you’ll see a screen with the outline for your topic. Review the outline created by the AI and adjust the headers as needed to suit your requirements.

Generate a draft
Click the “Let’s write” button when you’re ready. Your preferences will be taken into account when Surfer AI creates SEO-optimized content for your blog post.
And that’s it! Your article should be ready in about 10-15 minutes.
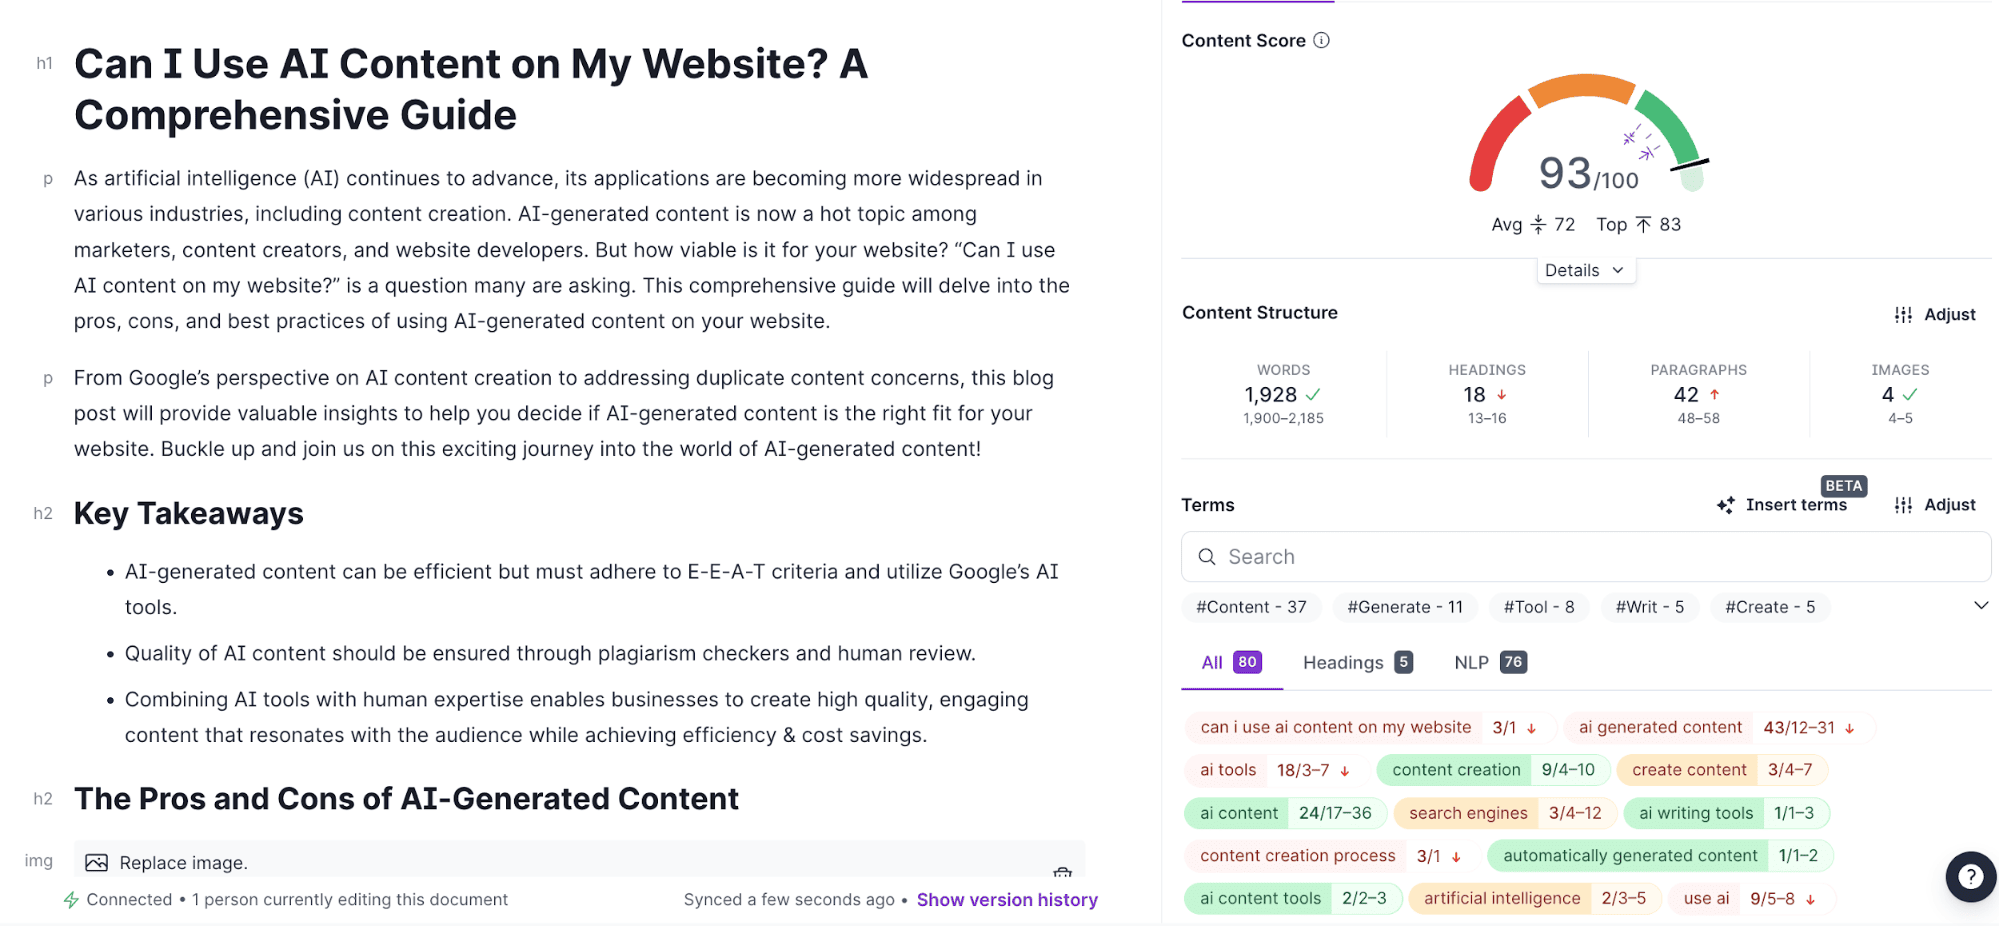
Before long, you’ll see a fully optimized article with your selected headers, highlights, a summary, and FAQs. These additions can improve your chances of appearing in the “People Also Ask” section of Google’s search results.
Surfer AI wrote a 1928-word article, which falls within the suggested range of 1900-2185 words, earning a content score of 93 in the Content Editor.
All of this in about 20 minutes!

What is Surfer Outline Builder + How to Use It:
Creating a good outline is the first step to organizing your article. A good outline helps your content rank higher in search results. And if you’re not convinced, here’s an article that explains why!
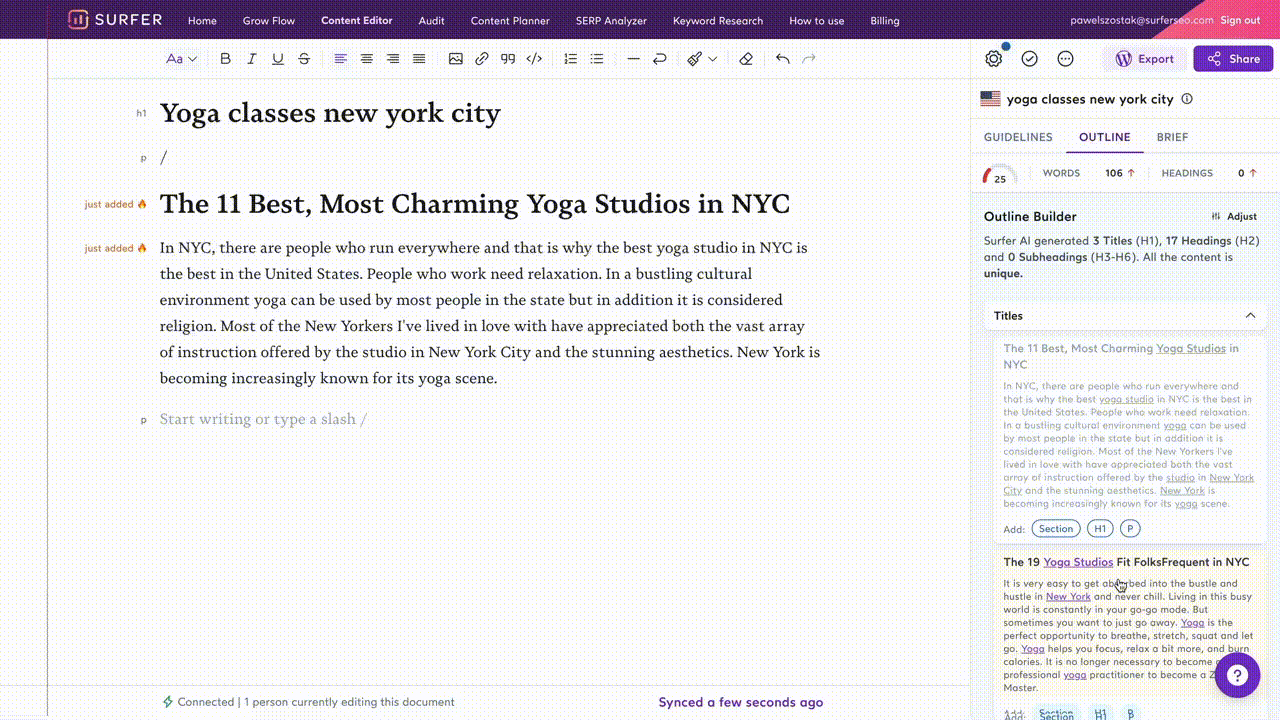
Surfer’s AI Outline Builder
Surfer’s AI outline builder helps you easily add important headings and paragraphs to your article. You can select the sections that are most relevant to make sure your article flows well. Here’s what you can expect:
- Subheadings under headings to keep your structure logical.
- Option to paste only headings or paragraphs instead of entire sections.
- Improved user interface with clearer labels for titles, headings, and subheadings.
- Content based on selected competitors to ensure relevance.
What is NLP (Natural Language Processing) and how does Surfer use it?
During the BERT algorithm update, Google improved its ability to understand the content on search results pages using machine learning. This helps Google identify and reward high-quality content.
BERT analyzes a page from a variety of angles, including context, sentiment, entities and overall meaning. By understanding what users are searching for, it can provide them with relevant content or direct answers.
Surfer also uses NLP, like Google’s BERT, to generate keyword suggestions that sound natural and are likely to rank well. NLP-powered entities are highlighted in Surfer’s audits, particularly in the True Density section.
These entities are phrases or words labeled by Google as important in understanding the content. You can identify them by the NLP icon next to them.
Why does NLP matter?
NLP, or Natural Language Processing, helps identify and assess entities, which are words or phrases representing identifiable objects like people, things, events, numbers, or organizations. Google uses these entities to understand content better and deliver more relevant search results.
By incorporating NLP entities, also known as keywords, into your content, you can improve its quality and relevance, making it more likely to rank higher in search results.
You don’t need to be an expert in machine learning to benefit from these tools. Let search engine tools handle the heavy lifting for you as you focus on optimizing your content.
Pixabay Integration
Surfer offers suggestions on how to improve the structure of your webpage, including the number of paragraphs, the number of words, and headings.
It’s also important to include images because they add context to your writing, can be optimized for SEO with alt-text, and enhance the user experience by breaking up the text.
Surfer has an integration with Pixabay, a platform for high-quality images, to boost your on-page SEO strategy. With this integration, you can access top-notch photos directly within Surfer’s interface.
You can either choose from suggested relevant images or explore Pixabay’s extensive database yourself, all without leaving your writing platform.
Extension – Google Docs / WordPress
Firstly, it’s important to highlight that this feature is absolutely free! If you’re someone who uses WordPress or prefers working with Google Docs, there’s a helpful article available to guide you through the process of installing the extensions!
Download Surfer’s free Chrome extension to use Surfer in Google Docs. In the same way peanut butter and jelly work together, these two tools are seamless.
Alternatively, if you’re a WordPress user, you can install a specific plugin provided by Surfer. This plugin allows you to use Surfer to update your existing content on your WordPress site. You can either refresh the content that’s already there or publish entirely new articles!
While many users rely on Surfer’s Content Editor to optimize their content, it’s important to note that their writing journey doesn’t have to end there. This feature is just one of many that are designed to make the process smoother!
Surfer’s WordPress Plugin
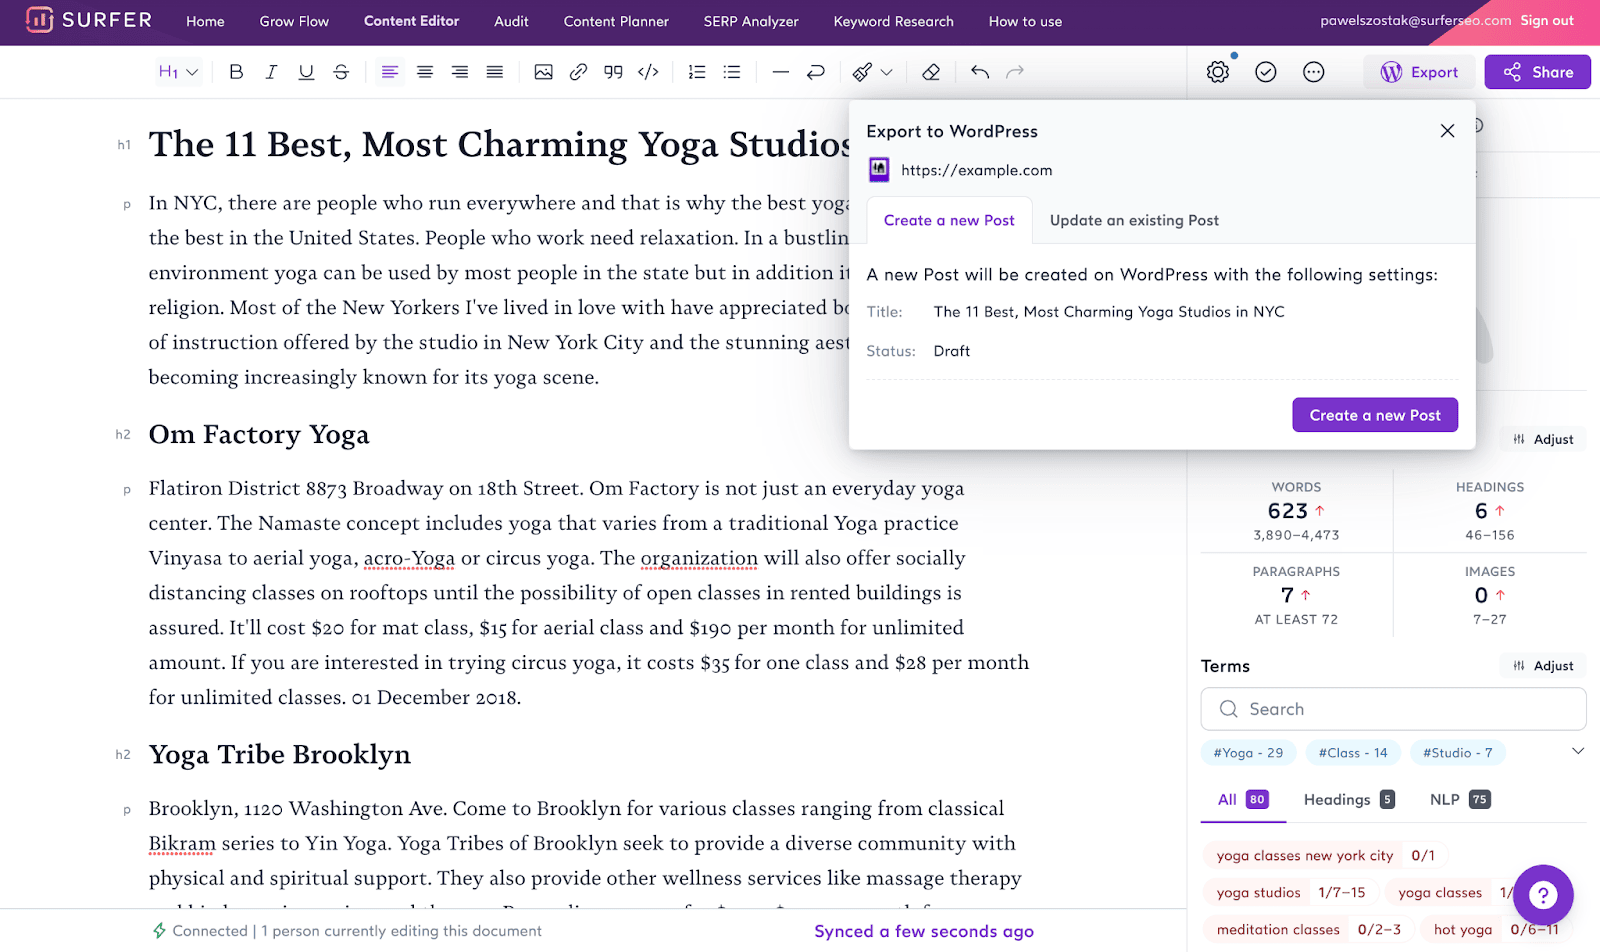
This plugin is completely free! With Surfer’s WordPress plugin, you can create new articles and edit existing ones directly in the Content Editor without leaving the Surfer interface.
This helps you speed up your content creation process because you can skip the step of copy-pasting your articles and avoid making versioning mistakes.
Another great feature of this plugin is that it allows you to easily manage who has access to your Surfer account and WordPress. If you have collaborators who need to publish their articles, they can do so directly from their Surfer account.
Here’s a handy tip: the plugin also helps with media management. When you add images to your article in Surfer, they will be automatically transferred to your media folder in WordPress.
Setting up the plugin is simple – just download and install it. Once it’s installed, you’ll receive notifications about updates directly in your WordPress admin panel. It’s that easy!
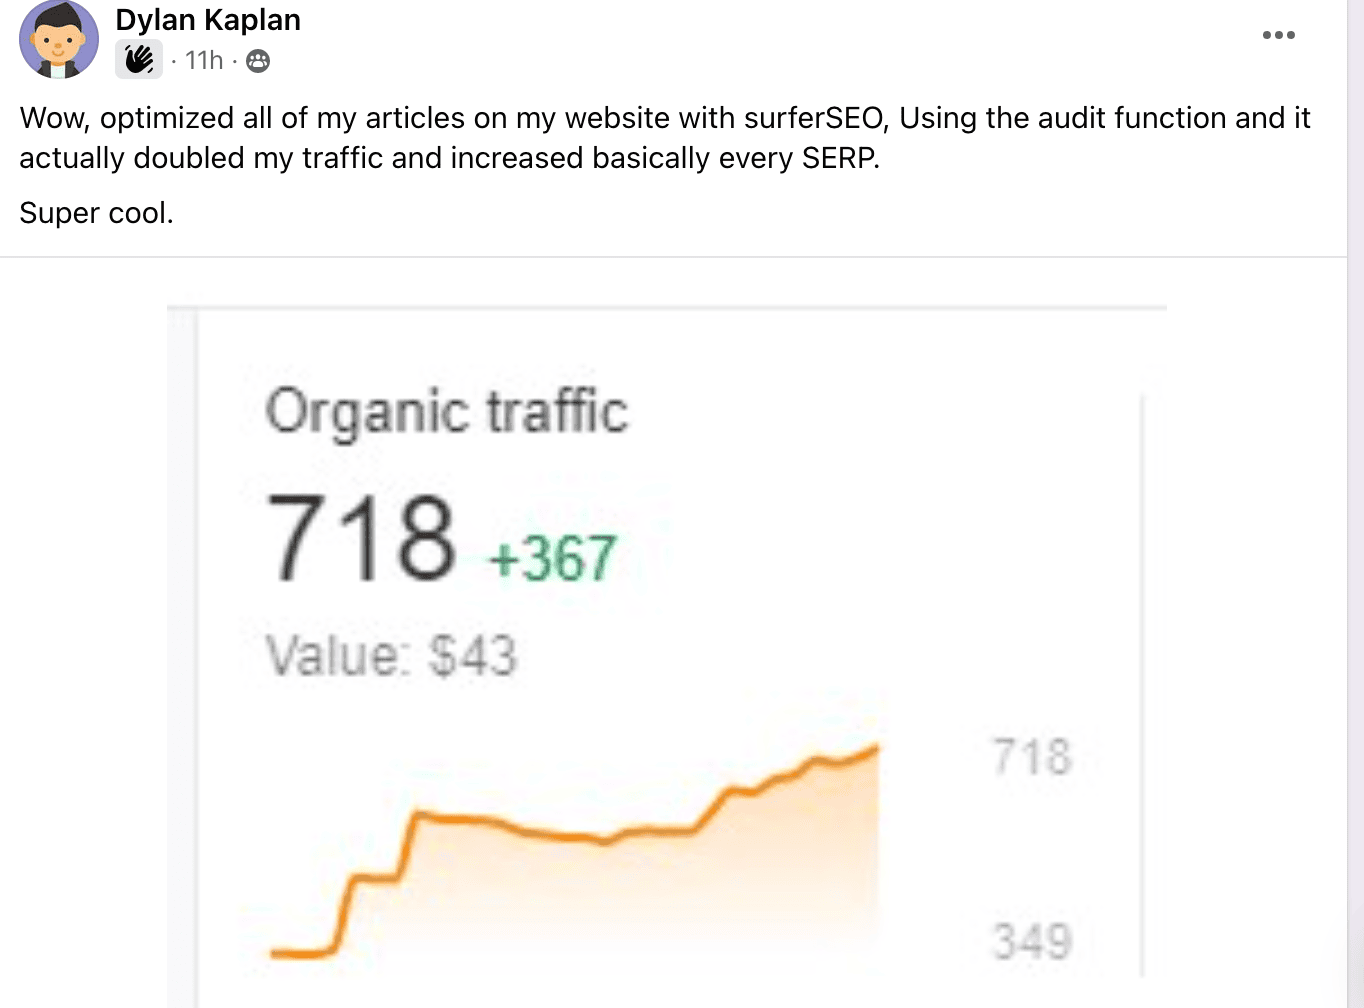
Audit: Post-Publishing Optimization
It’s crucial to keep optimizing your posts even after they’re published because search engine results pages (SERPs) are always changing. Your position on the search results isn’t guaranteed forever.
By using the Audit tool, you can see how your content is performing compared to your competitors and make changes to maintain or improve your ranking.
Thus, just because your post ranks well today doesn’t mean it will stay there forever. The Audit tool helps you keep track of how your content is doing compared to others, so you can make adjustments to stay competitive in the ever-changing world of search engines.
How to use Surfer’s Audit – one of the best SEO tools
To run an Audit report on a specific page, you just need to paste its URL into the tool and choose a keyword that represents the page’s topic.
Next, you’ll select the location you want to analyze, like a town or city, from a dropdown menu. If you can’t find the exact location you need, you can reach out to Surfer’s Support team for assistance.
Choosing the right SERP location is crucial because it determines which pages will be considered your organic competitors. These are the top 10 ranking pages on the search engine results page (SERP) for the keyword you’ve chosen.
Once your report is generated, make sure to click on the “Select competitors” button to see who you’re up against. This will help you understand where you stand compared to your competition.
The Audit report provides valuable insights into various aspects of your page’s performance, including:
Content Score: This is a dynamic score that takes into account different factors analyzed in the report.
Missing common backlinks: Identify potential backlink opportunities shared by your competitors.
Internal links: Get recommendations on linking to relevant pages within your website.
Terms to Use: Receive a list of keywords to include in your content along with guidance on their frequency and usage.
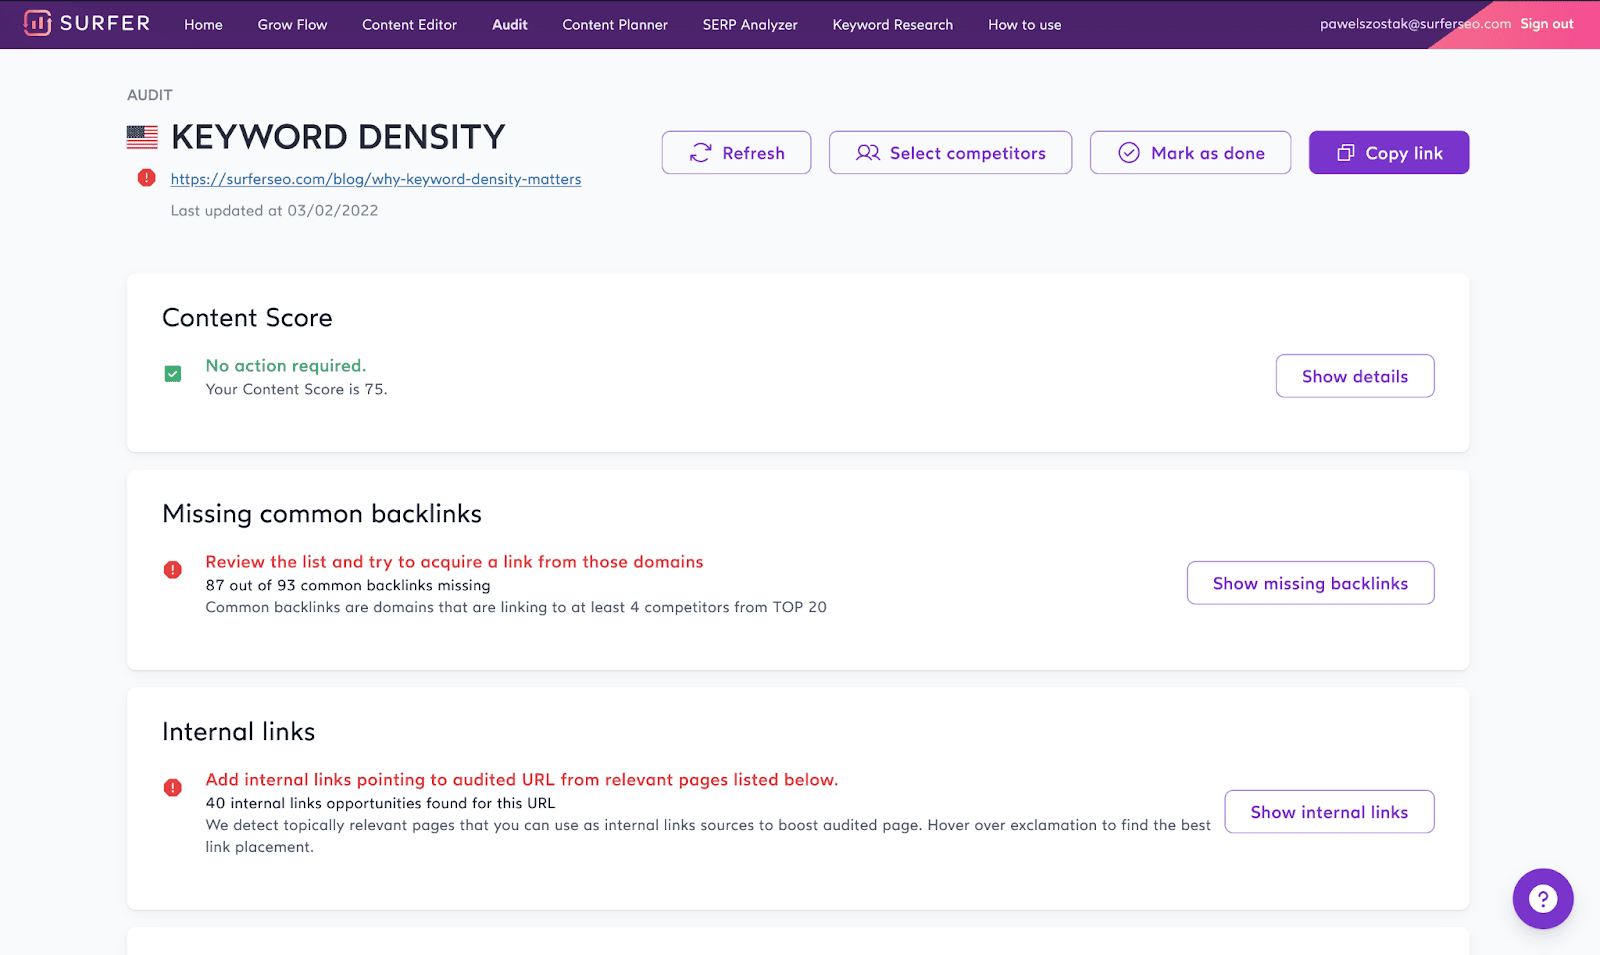
Word count + Page structure: Understand the recommended structure and length for your content.
Exact keywords + Partial keywords: See how well your content aligns with your target keyword.
Title and meta description length, Time to first byte, Load time: Gain insights into how your competitors handle titles, descriptions, and page speed.
To make changes based on the Audit report, you can either work directly in your content management system (CMS) or use Surfer’s Content Editor to import the content from the audited URL.

It’s important to note that there might be differences in the Content Score and guidelines between the Content Editor and the Audit report because they consider different aspects of your content.
The Content Editor focuses only on what’s written within the tool, while the Audit report looks at everything within the HTML of the page.
After implementing changes and confirming that your page has been re-indexed by Google, you can refresh the Audit report to see updated guidelines.
You can also share the Audit report with others by clicking on the “Copy link” button. Just make sure to use the URL generated by the button, not the one from the top of your page.
Overall, the Audit report is a powerful tool for optimizing your content and staying competitive in the ever-changing world of search engines.
How to use Surfer SEO Keyword Research
Keyword Research is a fantastic tool for anyone looking to:
- Discover other keyword options related to their main keyword.
- Establish their website’s relevance to certain topics.
- Develop a strong plan for their content.
- Get an idea of how tough it might be to rank for specific keywords.
- To begin using Surfer’s Keyword Research, you need to pick a keyword and a location.
When selecting a keyword, you should do one of the following:
- Choose a broad keyword.
- Select a category related to your business or website.
- Pick a category from your blog or website.
The keyword you pick doesn’t have to be your main target keyword. If you narrow down your focus too much, you might limit your suggestions.
Luckily, there’s no limit to the number of Keyword Research searches you can do. So, feel free to experiment with different keywords until you find the perfect cluster that suits your audience’s needs!
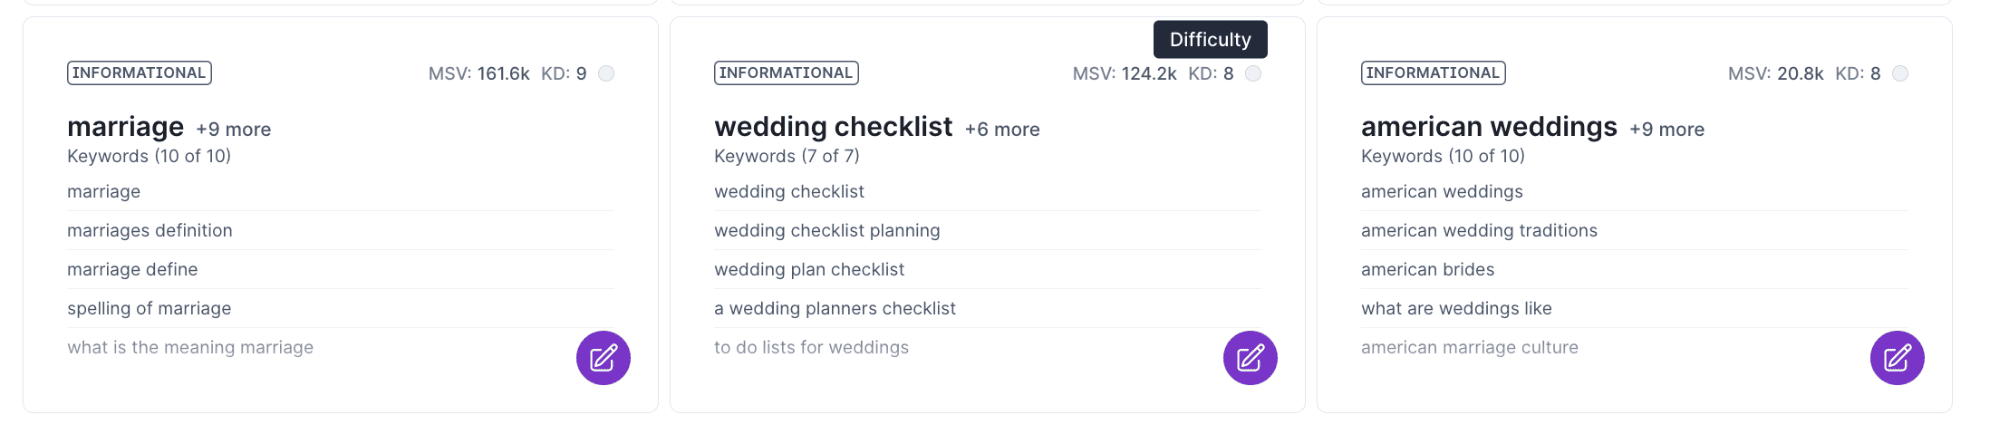
After entering your preferred keyword, you’ll see a page filled with topic clusters. These are groups of keywords and topics that often rank together. You’ll also get important details like search intent, monthly search volume, and keyword difficulty.
If you’re interested in relative keyword difficulty, which shows how well your website can rank for a particular keyword, you’ll need to connect to your Google Search Console (GSC).
When choosing the SERP location, click on the dropdown menu and type in your desired location, like a city or country. If it’s not available, you can contact Surfer’s Support team to request its addition.
Surfer works well with most languages. For the best results, type your keyword in your preferred language and choose a SERP location that matches it.
Review the relevant topic clusters sorted by search intent. Detailed information about each cluster, such as monthly traffic and search volume, is shown when you expand each cluster.
This makes it easy to develop a winning content strategy that boosts your website’s authority and fills any content gaps you might have.
Once you’ve picked the cluster you want to focus on, simply click the “open Content Editor” button to start writing!
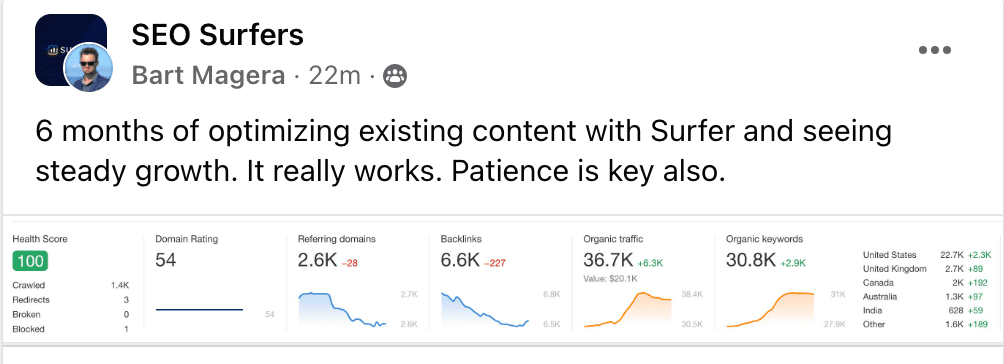
How to Optimize Existing Content With Surfer SEO
Here’s my simple guide to conducting a thorough audit. I Swear by these tips and you can thank me later after you have used these tips and seen upward trajectory in your search engine results.
Identify a page that needs optimization: Start by finding a page on your website that could use some improvement. It might not be performing as well as you’d like in terms of clicks and impressions, or it could be just on the brink of breaking into the top search results.
Even if it’s been a while since you published it, remember that SEO requires ongoing attention.
Generate an Audit:
Once you’ve chosen the page to audit, select a main keyword and the target location for that page. This will help Surfer analyze how well your page is optimized for its intended purpose.
Review the report and make changes:
Take a look at the audit report that Surfer generates and carefully review its suggestions for improvement. Decide which changes are most relevant and implement them on your page.
Refresh the Audit after updating:
After you’ve made your changes and confirmed that your page has been re-indexed by search engines, refresh the audit report. This will show you the impact that your changes have had and help you track your progress over time.
Quick Links:-
Conclusion: How to use Surfer SEO
In my opinion, what truly sets Surfer apart is its continuous evolution and adaptation to the ever-changing needs of the market and the valuable feedback from its dedicated users like me. Surfer is not stagnant; they’re always striving to stay ahead of the curve.
What I find most exciting is the frequent updates, integrations, and enhancements that Surfer consistently rolls out. Features like Surfer AI and Surfy have been game-changers, and I’m eagerly anticipating what they have in store for us next.
With Surfer, I feel confident that I’m using a tool that’s always evolving to meet my needs and surpass my expectations.